PiFinder User Manual
Thanks for your interest in the PiFinder! This guide describes how to use a PiFinder but if you want information on building one, please see the Build Guide and the Bill of Materials.
This user manual is divided into several sections which you can access using the links to the left. Now, let’s dig deeper into the various functions of the PiFinder!
How It Works
The PiFinder is a self-contained telescope positioning device. It will let you know where your telescope is pointed, provide the ability to choose a particular target (like a Galaxy or other DSO) and direct you on how to move your telescope to find that object. There are some other nice features along with these core functions, but the PiFinder is designed primarily as a way to get interesting objects into your eyepiece so you can take a look at them.
In order to direct you to wonders of the night sky, the PiFinder needs to know where your telescope is currently pointed. The primary way it does this is directly, but taking photos of the night sky and examining the star patterns to determine what section of the sky it’s seeing. It can do this incredibly fast (up to two times per second!) and very accurately. This only works well if your telescope is not moving, so it couples this very accurate system with an accelerometer to provide an estimate of how far your telescope has moved from the last known position. This estimate will contain some error, but as soon as you stop moving the scope a new photo will be taken and any inaccuracty will be corrected.
Along with knowing where your telescope is pointing, the PiFinder knows where thousands of interesting objects are located. It can use these two pieces of information to indicate how you should move your telescope to bring any of those thousands of objects into your eyepiece. Since it’s directly observing where your telescope is pointing, you can be assured you are on target!
Observing Screens
The observing functions of the PiFinder are split into various screens that you can switch between. Each screen makes use of the B, C, D, UP, DN, and ENT keys in their own way… but the A key always switches between them. When switching between screens a hint is displayed at the bottom to remind you what the B/C/D keys do for that particular screen.
The A key on it’s own cycles between the four main screens:
|
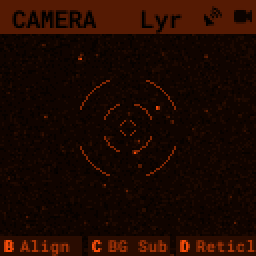
Camera The Camera screen shows a live preview of what the camera is currently seeing. This screen is used for setting focus and aligning the view of the PiFinder with your telescope Function Keys
|

|
Chart This screen shows a star chart centered on your telescopes position. As you move your scope it will be updated in real time and can show contellation lines as well as DSO’s from your observing list! The reticle circles are 0.5, 2, 4 degrees.
Function Keys
|

|
Catalog From the catalog screen you can search for and select deep-sky objects to locate. There is a variety of information about each object and you can filter by various criteria. Function Keys
Click for more info about the Catalog system. |
|
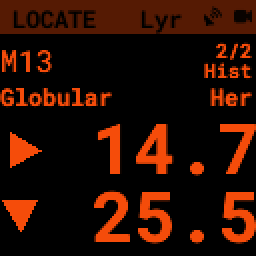
Locate Once an object is selected from the catalog the Locate screen will show you how to move your telescope to find that object. Function Keys
Click for more info about the Observing Lists screen and observing lists |
Utility Screens
There are two screens that are not often needed and provide deeper information about the PiFinder. Most nights observing you’ll never need to access these.
By holding down the Enter key and pressing the A (ENT-A) function key you can get to the less commonly used screens:
|
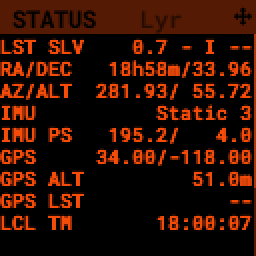
Status The Status screen provides information about the PiFinder and it’s various bits of hardware like the accleromiter and GPS. There is also information about the solving state and other functions. This is also the screen which allows you to set Global Options
Function Keys
|
|
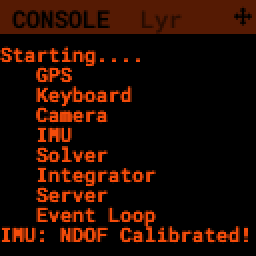
Console In normal operation the PiFinder will sometimes note information here about things that have happened. You can scroll through these on this screen. Function Keys
|
Option Pages
Many screens have options which change the way they behave or perform other less commonly used actions. Pressing and holding the A button will bring up the options for whichever screen you are currently using. To exit the option screen press A to return to the previous screen.
The options screen will show one option or action item per line with the name or description of the item to the left and the current value to the right. The bright numbers along the left edge indicate the key on the keypad to press to access that item.
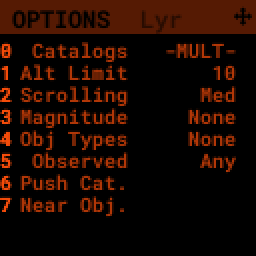
Once an item is selected the item will be highlighted and the available values or types of actions will be listed along the right hand side. The bright numbers along the right hand side will let you select the value(s) for this item.
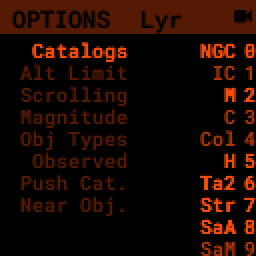
Some types of options can only have a single value, like Magnitude above. Others, such as Obj Types will allow you to select multiple values. If an option only has a single value, selecting it will return you to the main options page. For options that can have multiple values, you’ll need to use the ENT key to confirm your selections and return to the main option page.
The Options screen can also contain less commonly used actions which will take place when a value is selected.
Global Options
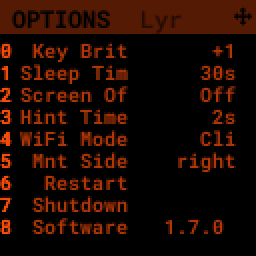
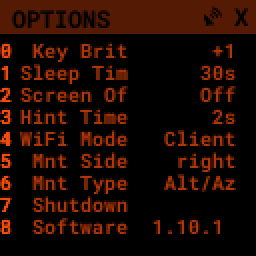
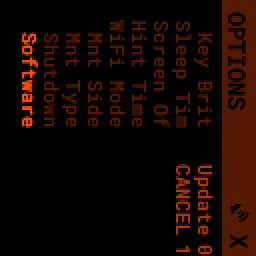
The Options page for the Status screen is special and gives access to general PiFinder options and actions. Used the ENT-A combo to cycle through the utility screens until you get to the Status screen. Then press and hold the A key to access the option page.
Adjust the key backlight brightness relative to the screen
Set the power saving sleep time
Set the screen saver time
Choose how long hints are visible when switching screens
Change WiFi Mode between client and access point
Switch between left/right/flat orientation
Restart the PiFinder software
Shutdown the PiFinder before powering it off
Update the PiFinder software
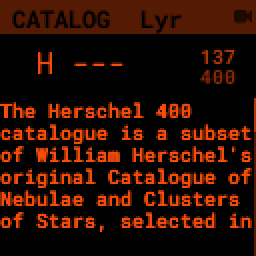
Catalog
The catalog screen allows the searching and selection of astronomical objects to locate. It has multiple catalogs available and displays some basic information about each object. You can set filter criteria to limit the objects listed for each catalog.
The B function keys toggles between a description of the object, if available, and information about how often you’ve observed that object.
The C function keys will cycle through the various catalogs available. The upper-left will show the count of filtered objects over the total number of objects in each catalog.
Use the number keys to enter the id of the object you are looking for. As you type, any matching object will be displayed. Typing in 74 to look for Messier 74 will bring up Messier 7 and 74 in turn as you enter numbers.


If the number you have entered matches an object in the catalog, information about the object will be displayed below including:
Object Type
Constellation
Magnitude
Size
Other names
IC/NGC coded observing notes
Number of times you have logged that object
Pressing the B key will switch between the text description and Object Images
Use the D key to clear the number field out and start fresh. If you find an object you are interested in, pressing the ENT key will add it to your target list and switch to the Locate screen
Holding the A key for two seconds will bring up the settings for the catalog. You can filter by apparent altitude, magnitude and object type. The Options page also has an action to push the currently filtered catalog to the observing list. Pressing A will bring you back to the catalog and update the count of objects that match your filter.
The UP/DN keys will scroll through the currently filtered objects.
Object Images
If you have used the prebuilt PiFinder image or have downloaded the set of catalog images you can view what the selected object looks like via images from sky surveys. Pressing the B key will cycle through various pages of information about each object including images from the Palomar Observatory Sky Survey and potentially updated images from the Sloan Digital Sky Survey.
As an example, here are the images available for M57


These images are oriented as they would be through the eyepiece in a newtonian reflector pointing at a specific area of the sky from your current location. You can use the UP and DN keys to switch between several eyepiece field of view: 1, 0.5, 0.25, 0.12 degrees
The bottom left of the screen shows the source of the current image and the left side shows the current FOV information.
Observing Lists
The Locate screen uses the last solve and currently selected target to provide a visual indication of which direction to move your telescope in order to center the target. It also provides a summary of the current target and information about the overall target list.
Values are expressed in degrees with the top line being rotation in Azimuth and the bottom line in Altitude.
UP/DN will cycle through the active list. The numbers in the upper-right corner of the screen represent the index of the current object / total number of objects in the list and the list name is displayed directly below.
ENT will switch back to the catalog screen to access full information about the current target
B will switch to your History list
C will switch to the active Observing list, if there is one
Holding the A key will open the Options page where you can load and save observing lists to disk
The currently target is also displayed on the screen as a small tick mark.
PiFinder maintains two lists of objects for each observing session; The History list and the Observing list. The Locate screen lets you scroll through these lists and push the telescope to any object on them.
The History list will record any object that you set as a target to push-to. It’s added to as soon as you press the ENT key on the catalog screen to select an object. The main purpose of the History list is to let you scroll back through objects you have observed that session.
The Observing list is a list of objects that is populated from either a filtered catalog or a file on disk. It’s a list of objects you’d like to observe during a session.
Both these lists start empty at the beginning of each session. To populate an observing list you can push a filtered list of objects from the Catalog screen or use the Options page to load an observing list from disk. The PiFinder supports .skylist file format used in SkySafari and adopted in many other applications as well.
Logging Observations
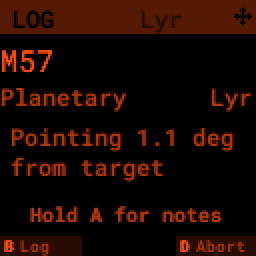
The Log screen can be accessed at any time by long holding the ENT key. It allows you to record your observation of the currently selected target in a database as part of a session. Each session starts when you power-up, or reset, the PiFinder and every observation logged during the session will be grouped together for later review.
Summary information about the current target is displayed along with the distance from the current telescope position. This distance allows you to make sure you are observing/logging the correct object in a crowded field, like Virgo.
You can add some details about your observation by holding down the A key to add notes.
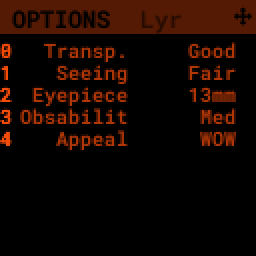
Transp. : The transparency of the sky. This is often noted along with Seeing below
Seeing: The stillness of the atmosphere.
Eyepiece: You can note which of your eyepieces you are using.
Obsabillit: Observability - How easy is it to spot and recognize this object
Appeal: Overall rating of this object.. would you refer a friend?
Pressing the A key from the Observing Notes options will bring you back to the Log screen.
B key - Logs the current target to the database
D key - Abort and return to the previous screen
Observing Projects
If you are like me, you may enjoy various observing projects, such as observing all the Messier or Herschel objects. The PiFinder makes these longer term efforts easy by allowing you to log each object and then only showing you objects you have left that are visible during any observing session!
This section covers a lot of the basic catalog/locating/observing features of the PiFinder and how it can be used to pursue such a project.
Combining the ability to filter a catalog by observation status and pushing the nearest ‘X’ objects to the observing list allows you to work your way through a collection of objects easily.
Use the A key to cycle through the main screens until you get to the Catalog

Then use the C key to cycle through the available catalogs to find the Messier objects

Holding the A button for about a second will bring up the Options page of the Catalog screen

On this screen you can filter the catalog in various ways. By default, it will only show items that are higher than 10degrees above the horizon right now and will include objects of any magnitude, type and regardless of whether you have observed them or not. You can switch the observation filter to ‘No’ to focus on the Messier objects you’ve not yet observed.
Press the 3 key to bring up the Observed options

Then press the 2 key to select the ‘No’ option. Pressing the A key will return you to the Catalog page with your filters activated. You can see in the upper-right of the screen that the number of objects matching the filter is 47 of 110

We’re going to create an observing list from this filtered catalog. Hold down the A key to return to the Options page.
We can either push all the items that match our current filter using the 4 Push List action, or we can choose to create a list of objects near the current place the telescope is pointing. This is a great way to easily and quickly work through objects when they might be most visible based on your particular location.
Press the 5 key to select Push Near

You can select the number of nearby objects you want to push to the observing list. Let’s get 20 nearby Messier objects we’ve never logged observations for! Press the 4 key and you’ll end up at the Locate screen with a list of these 20 objects sorted by distance from the current pointing position.

The locate screen serves double duty by showing you where to move the telescope to center this object, and also letting you scroll through the observing or history lists. In the screenshot above were looking at item 1/20 in the Obsv (Observing) list. You can use UP and DN to scroll through the list. Or just push the scope in the indicated direction to observe M33.
When you have observed M33, hold down the ENT button to log this object.

Now that M33 is logged, it won’t show up any longer when you filter the Messier objects by ‘No’ observation.
Another way to use the observing list is to switch to the Chart screen. The currently selected target will be pointed to with the arrow around the reticle if it’s offscreen and an X if it’s on screen.

Use can use the UP and DN keys to zoom the chart in an out. Here is the chart zoomed out showing the location of M33 along with some of the other nearby objects on the observing list.

WiFi
Access Point and Client Mode
The PiFinder can either connect to an existing network via the Client mode, or serve as an wireless access point for other devices to connect to via the Access Point (AP) mode. Use the Web Interface or the Global Options page of the Status screen to switch between these two modes and to see which mode is currently active.
Using the PiFinder in Access Point mode creates a network called PiFinderAP with no password to allow easy connection of phones, tablets and other devices in the field.
To use the Client mode, you’ll need to add information about the WiFi network you’d like the PiFinder to connect to using the Web Interface as described in Connecting to a new WiFi network
PiFinder address
In most cases, you can use the name pifinder.local to connect to the PiFinder. On older computers or those that don’t support zeroconf networking, you can use the IP address provides on the Global Options screen to connect. You can connect to the PiFinder via:
A web browser to use the Web Interface for remote control, setting up access to other WiFi networks and for configuration changes
SSH to get shell access for advanced users
SMB (Samba) to access saved images, logs an observing lists
LX200 protocol to allow updating of a planetarium app, such as SkySafari , with the position of the telescope
Web Interface
The PiFinder provides an easy to use web interface which allows you to:
See the current PiFinder status
Remote control the PiFinder via a virtural screen and keypad
Change network settings and connect to new WiFi networks
Backup and restore your observing logs, settings and other data
View and download your logged observations
To access the web interface for the first time, make sure the PiFinder is in Access Point mode (see Global Options). This is the default for new PiFinders to make first time set up easier. Using a phone, tablet or computer, connect to the PiFinder’s wireless network called PiFinderAP. It’s an open network with no password required. Once connected, open your web browser and visit:
http://pifinder.local
|
|
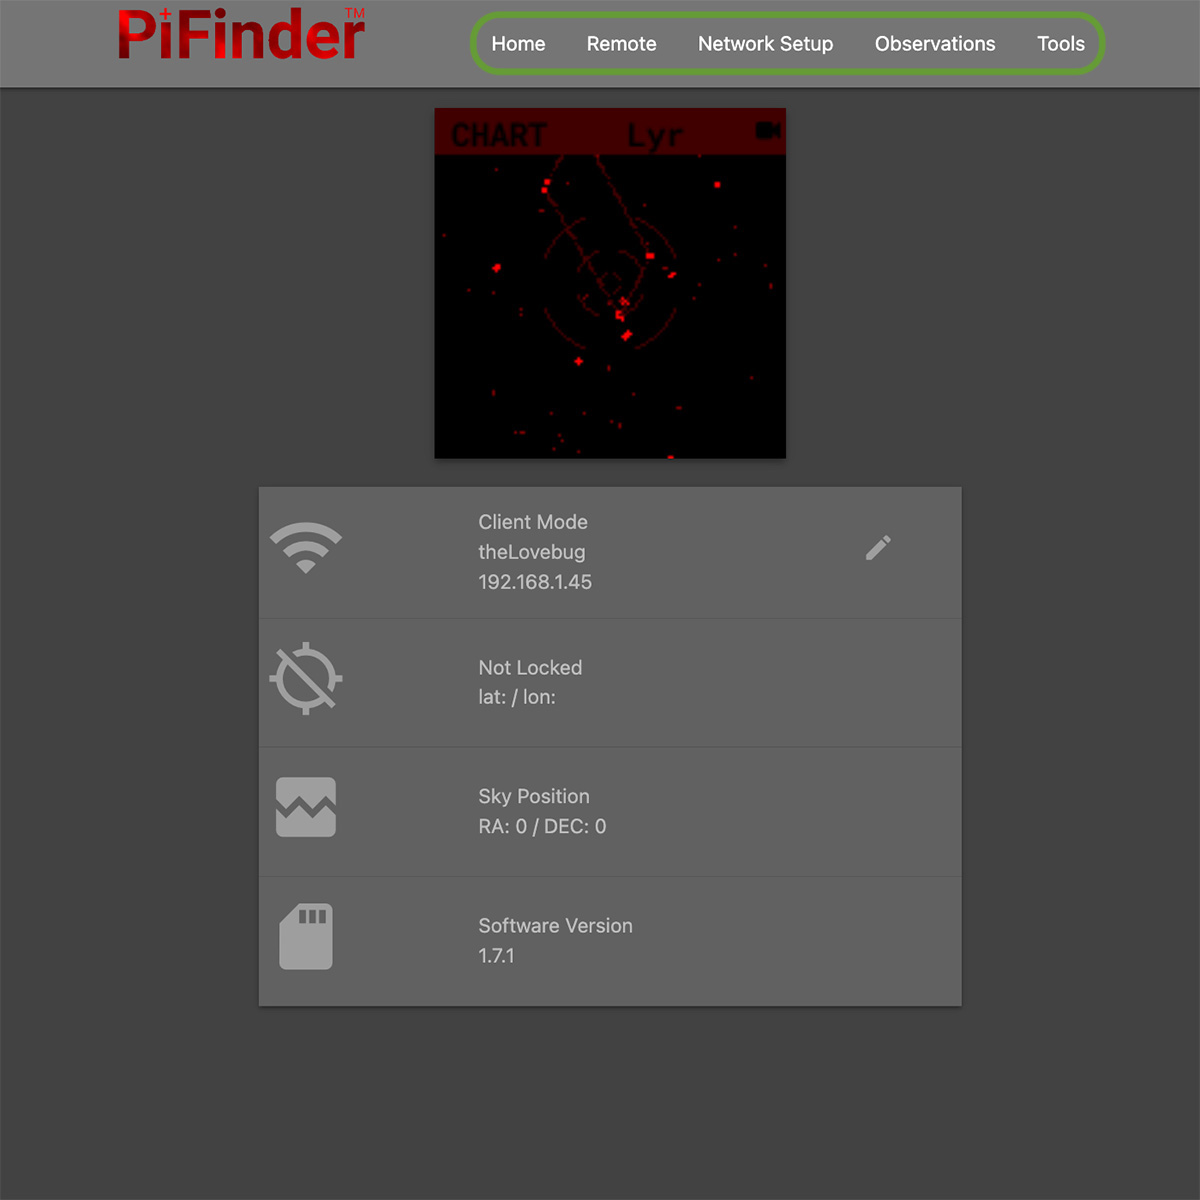
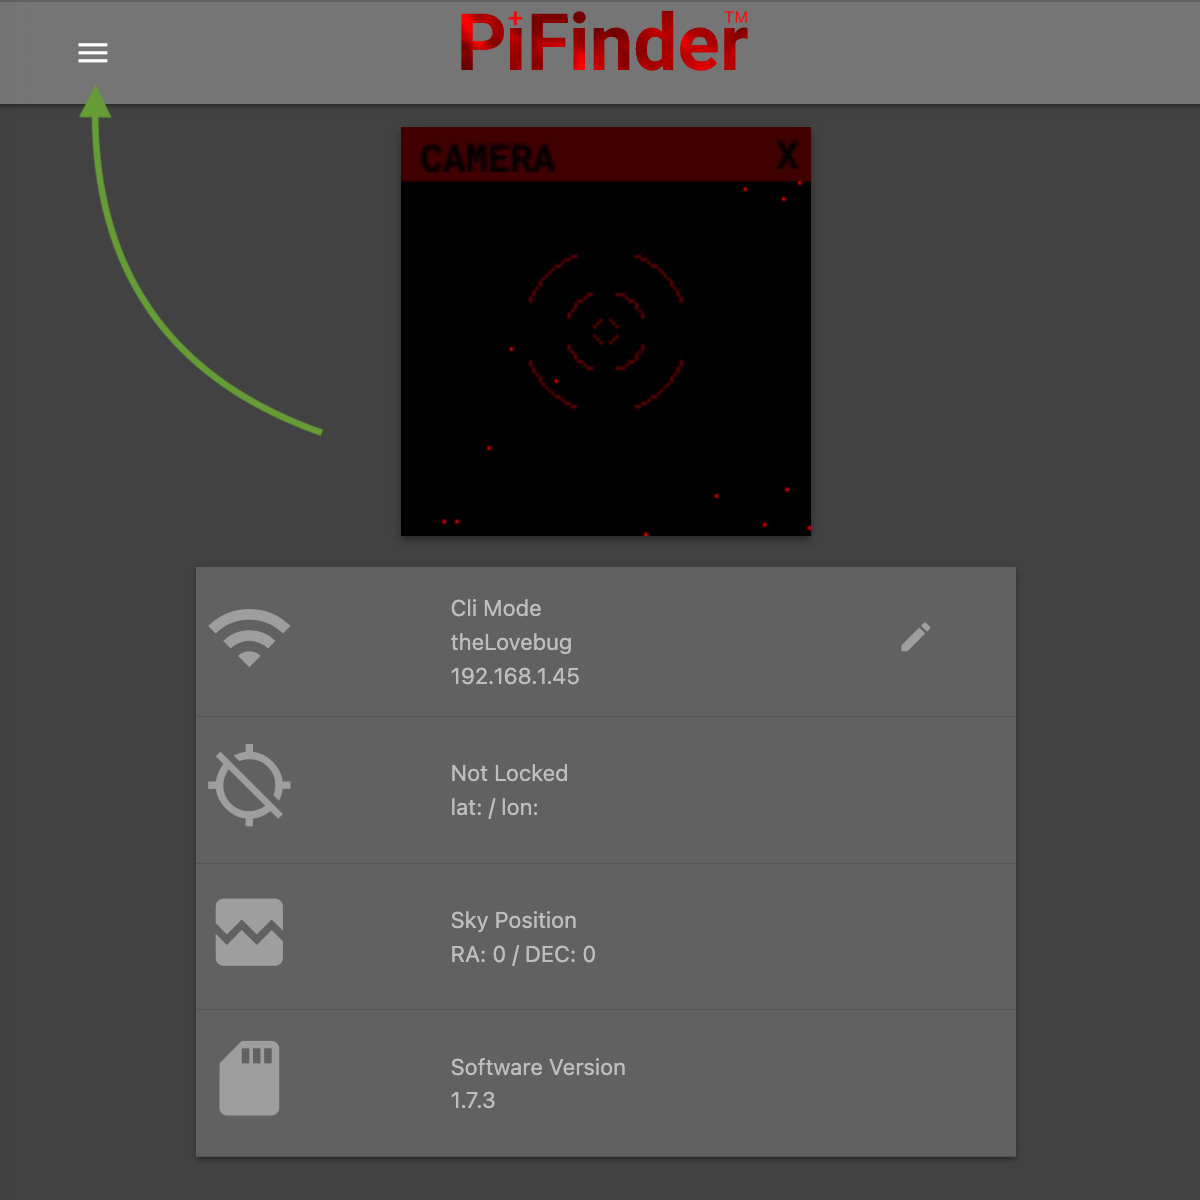
The home screen shows the general PiFinder status info and a live view of the screen. Depending on your screen size you’ll either see a navigation bar along the top of the page, or a ‘hamburger’ menu in the upper-left which contains these same options for smaller screens.
While the home screen not require a password, most other functions will. The password for the web interface is the same as what is used for the pifinder user and changing one will change the other. The default password for new images and PiFinders is solveit. This can be changed using the Tools option in the web interface.
Connecting to a new WiFi network
The default behavior of the PiFinder is to generate it’s own WiFi network call PiFinderAP that you can connect to
and configure additional networks. To get the PiFinder to connect to an existing WiFi network with Internet access you
can follow the steps below:
Make sure the PiFinder is in Access Point mode
Connect your phone, tablet, or computer to the PiFinder’s wifi network called PiFinderAP
Visit http://pifinder.local using your web browser
- Click the ‘Network’ link in the top bar, or if you have a smaller screen, click the three stacked horizontal lines in the upper-right corner to access the menu and choose ‘Network’ from there.
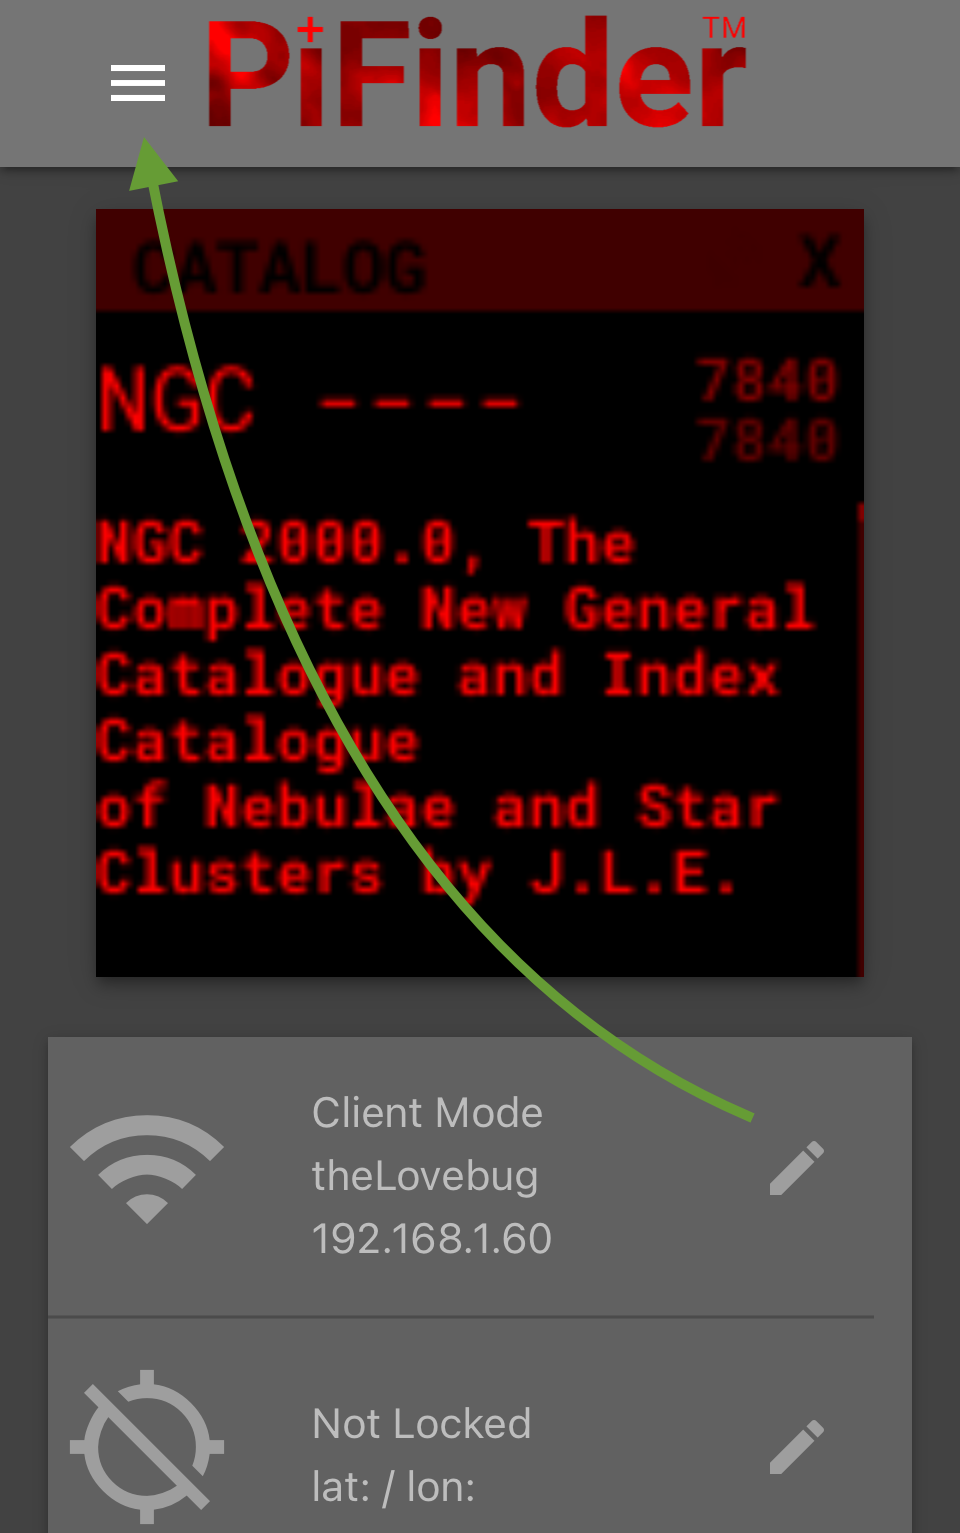
When prompted enter the password for your PiFinder. The default is solveit.
- Scroll down until you see the ‘Wifi Networks’ section and click the + button to add a new network
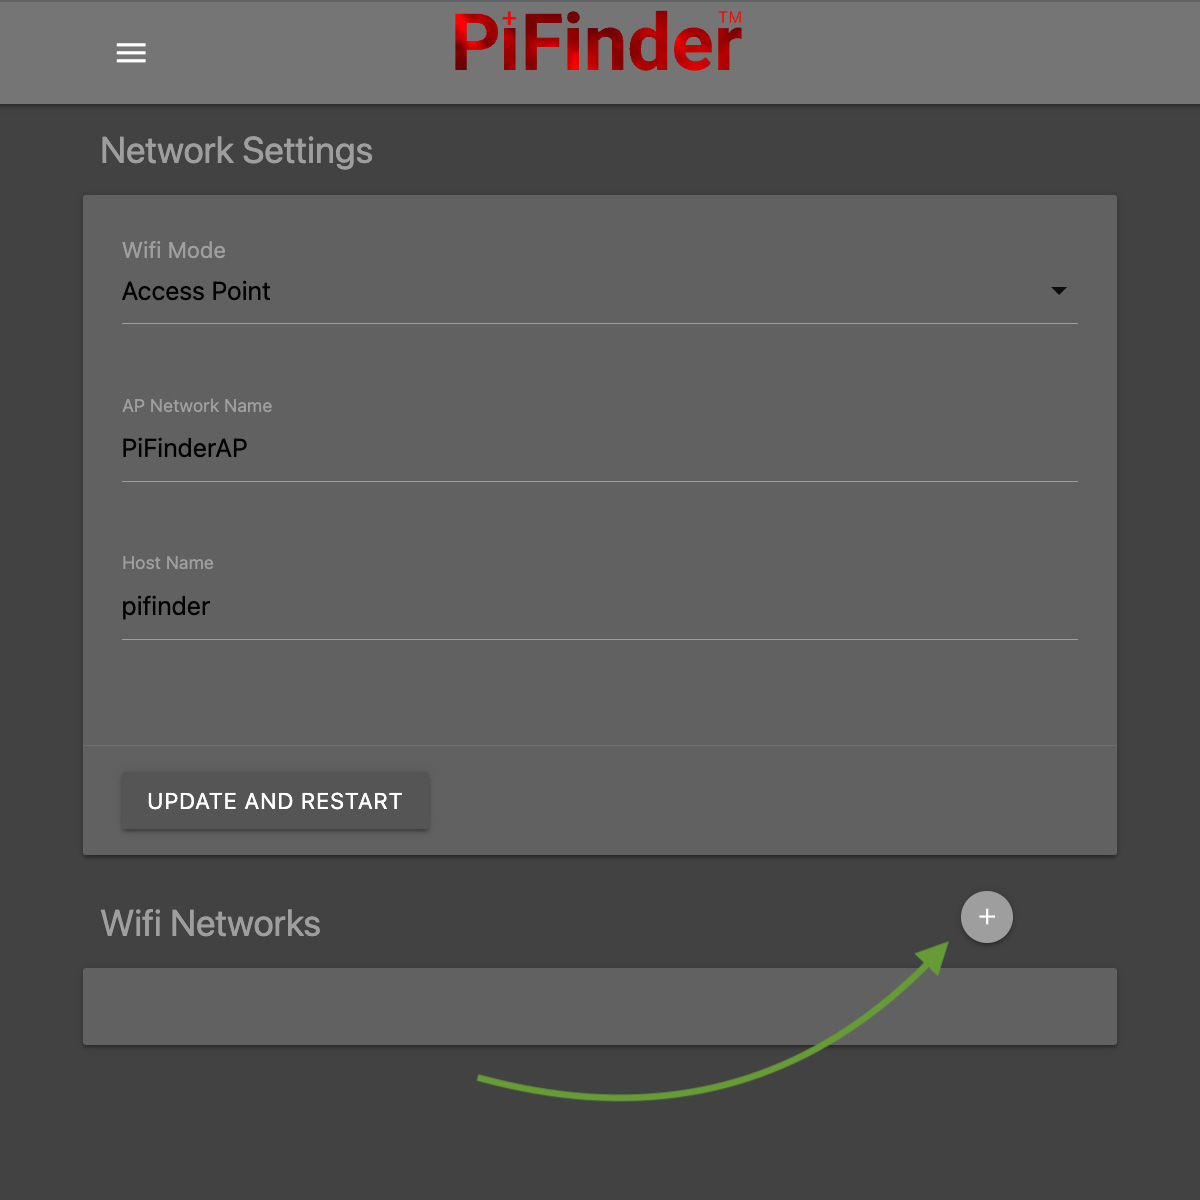
Enter the name (SSID) of your network and the password in the form. If your network does not have a password, leave the Password field blank.
Click the ‘SAVE’ button to save the new network
You should now see the network you added in the ‘Wifi Networks’ section of the page
Scroll up and change the Wifi mode from ‘Access Point’ to ‘Client’ so that the PiFinder will attempt to connect to your network next time it restarts
Click the ‘UPDATE AND RESTART’ button
To add more WiFi networks for the PiFinder to look for, navigate to the Network Setup page of the Web Interface and click the + button near the list of WiFi networks and repeat the steps above.
SkySafari
The PiFinder can provide real-time pointing information to a device running SkySafari via the LX200 protocol. See this SkySafari document for complete details, but here is the connection info:
Use ‘Other’ telescope type
Mount Type: Alt-Az, GoTo.. even if your scope is Push-To. This allows sending of targets from SkySafari to the PiFinder
Scope Type: Meade LX200 classic
IP Address:
pifinder.localor IP address provides on the Status screenPort: 4030
Update Software
A Software action is available from the Global Options screen. This will both show which version the PiFinder currently has installed and allow you to update the software if the PiFinder is connected to the internet. Step by step instructions for updating are below, and if you need to get your PiFinder connected to the Internet via your home wifi, please see the Connecting to a new WiFi network section of the Web Interface documentation.
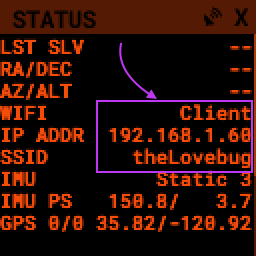
Press ENT-A to switch through the system screens until you are on the ‘STATUS’ screen.
- Make sure the PiFinder is in client mode, that the name (SSID) of your WiFi network is displayed and that there is an IP Address shown as indicated in the screenshot below. If the status screen says ‘AP’ in place of ‘Client’ you’ll need to switch the PiFinder into client mode so that it will try to connect to your home network. If you don’t see the name of your network and an IP address, please check your network settings using the instructions in Connecting to a new WiFi network
- Hold down the A button to access the configuration page for the STATUS screen
- Press the 8 key to select the ‘Software’ option.
Press the 0 key to begin the update
The PiFinder will indicate that the software update is in progress and will restart when finished. The update may take a couple of minutes and when it’s complete you can verify the version by navigating back to the Status page as described above.
Note
If the software version has not changed after the update, verify that the PiFinder is connected to a network with internet access, move closer to the WiFi access point and try again. To save power the WiFi transmitter on the PiFinder is not as powerful as a laptop or other device so you may need to be fairly close to your WiFi access point to successfully complete the update.
You can also download a pre-built image of any software release and write it to the PiFinder’s SD card. See our release page to find information about any of our releases and a link to download the images.
Instructions for writing software release images to an SD card can be found on the doc:software setup<software> page.
FAQ
Have any questions? Please send them through to me at rich@brickbots.com and I’ll do my best to help and potentially add your question here. Better yet, feel free to fork this repo and contribute via a pull request!