Developer Guide
If you are a developer, like to tinker with the code, troubleshoot you PiFinder in depth or contribute to the project: this guide helps you to do all these cool things.
Submitting issues, bugs and ideas
Generally the rule applies: if you ask a question or contribute, either here in GitHub, via Mail or in the discord channel, the more descriptive and precise you are, the better. Please always describe exactly what you found, what you expected and how the way is to reproduce the issue for others. Therefor you can additionally submit error logs, show us pictures of the problem or make screenshots. This helps a lot to speed up things.
Depending on the complexity of the problem, it is probably wise, to discuss the issue on the PiFinder Discord server in advance.
If you have a question, that is likely to be answered in short, the quickest way is to ask in the PiFinder Discord server in the section “support-software”. There are a lot of users and developers online who can help.
If you are serious about an error or you have seen a bug, then please feel free to open a descriptive issue here on GitHub.
Also, if you like to submit your ideas or have a wish for the PiFinder, you can use the issue page. This helps the developers to sort things out and prioritize.
Fork me - getting or contributing to the sources with pull request
If you like to alter or contribute new functionalities, fix errors in the code, or even just help with the documentation, best is to fork the code into your own GitHub account. Also, you can communicate your effort in the above mentioned PiFinder Discord server .
Within your fork, you can do all the fancy changes, you like to see in the PiFinder, test them locally. Then you can do a pull request to the original code of the PiFinder project. If you are a programmer you should already know the procedure. If not, here is how you do this:
Documentation
The PiFinder documentation
is written in reStructuredText .
The files are located in PiFinders GitHub repository under docs and have
the ending .rst. Many open source projects use redthedocs.io <eadthedocs.io>
for creating documentation since it is immediately generated, when you are committing
the GitHub code (CI/CD pipeline). It is very easy to link your fork of the documentation
code to GitHub.
Setup the development environment
On the PiFinder
The best development platform for the PiFinder is the PiFinder itself via SSH or with a monitor keyboard attached. This will let you develop and test any part of the code.
See the Build From Scratch section of the Software Setup guide for information on creating a base SD card and getting the base software running.
Other Options
Second to this is a standalone Raspberry Pi hooked up to a keyboard and monitor. This will make sure your code will run on the PiFinder, but you won’t be able to test the IMU, GPS or other physical hardware features. You can emulate these using the –fakehardware and –display flags. See below for more details.
You can also develop on any Posix compatible system (Linux / MacOS) in roughly the same way you can on a Raspberry Pi. The emulated hardware and networking features will work differently so this is mostly useful for UI/Catalog feature development.
To get started, fork the repo and set up your virtual environment system of choice using Python 3.9. Then follow some of the steps below!
Install python dependencies
For running PiFinder, you need to install some python libraries in certain versions. These lists can be installed via pip tool chain and are separated in two files: one for getting PiFinder to run, one for development purposes:
pip install -r requirements.txt
pip install -r requirements_dev.txt
Install the Hipparcos catalog
The hipparcos catalog will be
downloaded to the following location: /home/pifinder/PiFinder/astro_data/
wget -O /home/pifinder/PiFinder/astro_data/hip_main.dat https://cdsarc.cds.unistra.fr/ftp/cats/I/239/hip_main.dat
Install the Tetra3/Cedar solver
The Tetra3 Solver is a “fast lost-in-space plate solver for star trackers written in Python”. It is the next gen solver, that PiFinder uses.
This is set up as a git submodule and you will need to initialize it using the following command from with your checked out repo
git submodule update --init --recursive
Code Quality Automation
The PiFinder codebase includes features for maintaining code quality, adherance to style guide and for evaluation and testing. These will be installed along with the dev dependencies and should be available to run immediately.
NOX
We use Nox as an entrypoint to all of
the code quality tools. Simply run nox to from the PiFinder/python
directory and it will run (almost) all of the code quality checks and tests.
The first time it runs Nox will set up suitible environments for each session it manages and this might take a bit. Subsequent runs will be much faster.
To see what sessions are available use nox -l
To run only a specfic session use nox -s [session_name]
The defined sessions are:
lint -> Runs RUFF using
ruff check --fixto check/fix common code issues. It may produce warnings or fail completely if there are issues with new code you are working on. See the documentation for details on any errors it finds.format -> Runs
ruff formatto reformat code in the Black style.type_hints -> Runs my[py] to do static type analysis. The PiFinder code is not fully typed (yet!) but we are working on it and any new contributions will need to be fully annotated. If you’ve not worked with type-hinted Python before, we’ll help you out, so feel free to put up PR’s for non-type-hinted code and we can collaborate.
smoke_tests -> Runs PyTest and executes all tests marked SMOKE. Smoke tests should be FAST and provide some basic checking of sanity/syntax.
unit_tests -> Runs PyTest and executes all tests marked as UNIT. Unit tests should exercise more functionality and make take a bit more time. This Nox session is not run by default, but is executed on code check in to the PiFinder repository.
CI/CD
All pushes to the PiFinder repository will run all the defined Nox sessions. Automations for PR’s will need to be triggered by a maintainer, but you can (and should!) set up your fork to run the existing automation to validate your code as you develop.
If you need help, reach out via email or discord. We are happy to help :-)
Running/Debugging from the command line
When you installed all the dependencies, you like to develop and test your code. You like to see debugging information and all verbose messages. You probably like to save these informations into a file.
Therefore, switch to the ~/PiFinder/python folder and start the PiFinder
python program with the command line parameters you need for the certain use case.
cd /home/pifinder/PiFinder/python
python3 -m PiFinder.main [command line parameters]
You simply stop the program with “Ctrl + C”.
Remember: PiFinder is designed to automatically start after boot. So a PiFinder process is likely running. Before you can start a PiFinder process for testing purposes from the command line, you have to stop all currently running PiFinder instances. Simply, because you can not run multiple PiFinder instances in parallel. They would try to access the same hardware, which is not possible. You can do this e.g. with the following code, which uses awk to kill all runnding processes of PiFinder:
ps aux | grep PiFinder.main | awk '{system("kill -9 " $2)}'
-h, –help | available command line arguments
Get all PiFinder.main options with the “–help” flag.
pifinder@pifinder:~/PiFinder/python $ python3 -m PiFinder.main -h
Starting PiFinder ...
usage: main.py [-h] [-fh] [-c CAMERA] [-k KEYBOARD] [--script SCRIPT] [-f] [-n] [-x] [-l]

eFinder

optional arguments:
  -h, --help            show this help message and exit
  -fh, --fakehardware   Use a fake hardware for imu, gps
  -c CAMERA, --camera CAMERA
                        Specify which camera to use: pi, asi, debug or none
  -k KEYBOARD, --keyboard KEYBOARD
                        Specify which keyboard to use: pi, local or server
  --script SCRIPT       Specify a testing script to run
  -f, --fps             Display FPS in title bar
  -n, --notmp           Don't use the /dev/shm temporary directory. (useful if not on pi)
  -x, --verbose         Set logging to debug mode
  -l, --log             Log to file
Note
The available command line flags may change with forthcoming releases. Always refer to the real output of the command line parameter “-h”.
-x, –verbose | debug information
You enable the debug information output simply by passing the ‘-x’ flag.
pifinder@pifinder:~/PiFinder/python $ python3 -m PiFinder.main  -x
Starting PiFinder ...
2024-03-17 11:31:26,285 root: DEBUG using pi camera
2024-03-17 11:31:26,383 PiFinder.manager_patch: DEBUG Patching multiprocessing.managers.AutoProxy to add manager_owned
2024-03-17 11:31:26,431 root: DEBUG Ui state in main is{'observing_list': [], 'history_list': [], 'active_list': [], 'target': None, 'message_timeout': 0}
Write: Starting....
Write:    GPS
Write:    Keyboard
2024-03-17 11:31:28,544 root: DEBUG GPS waking
[...]
–display DISPLAY
Start the PiFinder software with a particular display device. This is useful for devloping on a different posix system like MacOS or Linux. Available options are:
ssd1351 - This is the standard 1.5” OLED screen (DEFAULT)
pg_128 - PyGame emulated 128x128 display. Use this for developing/testing PiFinder code on a laptop or desktop.
-c CAMERA, –camera CAMERA
Use the “fake” camera module, so the PiFinder cam ist physically not necessary for testing purposes. Else specify which camera to use: pi, asi, debug or none.
python3 -m PiFinder.main -k local --camera debug -x
-fh, –fakehardware | imu, gps only
This uses fake hardware for the imu and gps.
python3 -m PiFinder.main -fh -k local --camera debug -x
-k KEYBOARD, –keyboard KEYBOARD
A switch between the pi keyboard (on a real device), the local keyboard (eg Mac with emulated screen) or via a webserver. That last one will probably be retired because the remote server is always started.
python3 -m PiFinder.main -fh -k server --camera debug -x
Troubleshooting
My app crashes
When crashing, there are many unrelated stack traces running. Search for the relevant one. The rest is not important, these are the other threads stopping.
Test the IMU
Attention
Other possibilities? E.g. cover some pins?
First power up the unit and look at the Status page while moving it around. The status screen is part of the Tools menu.
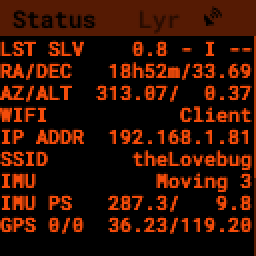
If the IMU section is empty (”- -”) or does not move, it is likely, that either the IMU is defect or you have a problem on your board.
Please check, if the board is soldered all pins correctly and did not shorten anything (spurious lead).
If you sourced the parts by you own, it might be, that you bought the wrong IMU hardware version. You need the 4646 versio. On the non-stemma QT versions, the data pins are switched. See here on Discord.
The IMU is defect.
If the IMU is defect, this only can be tested by removing the faulty hardware and replacing it with another one.
The demo mode - it is cloudy, but I like to test my PiFinder anyways
Using the demo mode you will be able to run the PiFinder and almost all it’s functionality, but not under the stars. Therefore the PiFinder get’s an image of the sky from the disc instead from the camera and uses it. You can use all PiFinder commands, like searching for an object, you see the IMU run and you get a “fake” GPS signal. You also can check the PiFinder keyboard and the complete menu cycle.
The way to get this functionality, is to enter PiFinder in the ‘test’ or ‘debug’ mode.
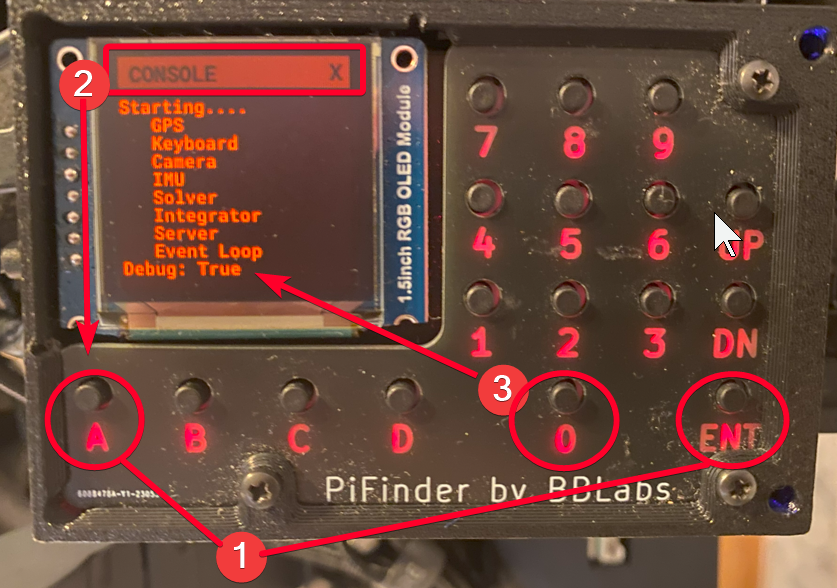
First method: Press (short press) “ENT-A” again and again to cycle through the screens until you get to the Console screen. There press the “0” key (the display shows the message “Debug: true”). This will supply a fake GPS lock, time and cause the PiFinder to just solve an image from disk. But it will respond to IMU movement and allow use of things like Push-To and all the other functions that require a solve/lock. You can leave the “demo mode” by just again cycle to the Console screen and press “0” again (the display shows the message “Debug: false”).
Second method: run PiFinder with the Running/Debugging from the command line functionality.
Note
If you are using the demo-mode and move the PiFinder and scope around, you will notice, that the picture alway starts at the same “standard demo picture”. And it always switch back to the same picture, once you stopped. Do not expect to move through the sky, like you normally would do and get a solve to the newly reached location. You will always be brought back to the same position in the sky.