PiFinder™ User Manual
Note
This documentation is a work in progress for v3 and v2.5 PiFinders running software 2.0.0 or above. If you need docs for a previous version please Click here
Thanks for your interest in the PiFinder! This guide describes how to use a PiFinder but if you want information on building one, please see the Build Guide and the Bill of Materials.
This user manual is divided into several sections which you can access using the links to the left. Now, let’s dig deeper into the various functions of the PiFinder!
How It Works
The PiFinder is a self-contained telescope positioning device. It will let you know where your telescope is pointed, provide the ability to choose a particular target (like a Galaxy or other DSO) and direct you on how to move your telescope to find that object. There are some other nice features along with these core functions, but the PiFinder is designed primarily as a way to get interesting objects into your eyepiece so you can take a look at them.
In order to direct you to wonders of the night sky, the PiFinder needs to know where your telescope is currently pointed. The primary way it does this is directly, but taking photos of the night sky and examining the star patterns to determine what section of the sky it’s seeing. It can do this incredibly fast (up to two times per second!) and very accurately. This only works well if your telescope is not moving, so it couples this very accurate system with an accelerometer to provide an estimate of how far your telescope has moved from the last known position. This estimate will contain some error, but as soon as you stop moving the scope a new photo will be taken and any inaccuracty will be corrected.
Along with knowing where your telescope is pointing, the PiFinder knows where thousands of interesting objects are located. It can use these two pieces of information to indicate how you should move your telescope to bring any of those thousands of objects into your eyepiece. Since it’s directly observing where your telescope is pointing, you can be assured you are on target!
Note
If you would like a general overview of how to use the PiFinder, please give the Quick Start a read. This menual goes more in depth but does not cover some of the first time set-up items in the Quick Start
Adjusting Brightness
The PiFinder is designed to allow you to adjust the brightness of the screen and keypad at any time: simply hold down the SQUARE button and push + for brighter, or - for dimmer. In a dark sky site, you can turn the brightness down to preserve your dark-adapted vision.
Note
The PiFinder will dim the screen and reduce the frequency of exposures, solving, and other processes when it’s been idle for a period of time. This helps save battery power and can also prevent glare at the eyepiece in especially dark environments. The default is 30 seconds and this can be configured, or turned off completely, in the Settings Menu
Pressing any button, or moving the PFinder will wake it from power save mode.
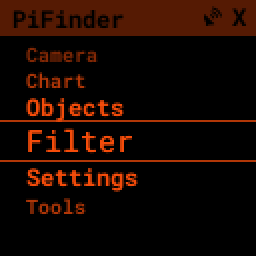
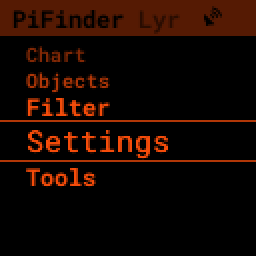
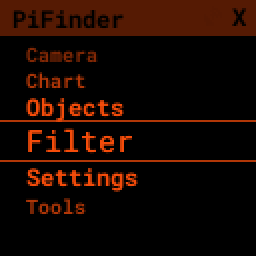
The Menu System
All the functions of the PiFinder can be accessed via it’s menu system:

Each menu is a list of items that represent a sub menu, screen, or a set of options you can choose from. You can scroll though each menu and make selections using these keys:
The UP and DOWN arrows will scroll the current menu
The RIGHT arrow will activate the current option; selecting it or moving to another menu
The LEFT arrow will take you back to the previous menu or screen
Holding LEFT for more than one second will always take you back to the TOP of the menus
The status bar at the top of the screen will show the name of the menu you are currently viewing.
Screens
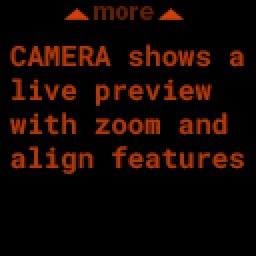
When you choose some menu items, like Camera, these will lead you to a specific screen such as showing the camera preview, a start chart or details about a particular catalog object. Each one of the screens are covered in more detail below.
Options
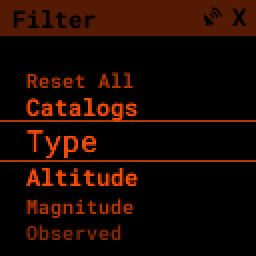
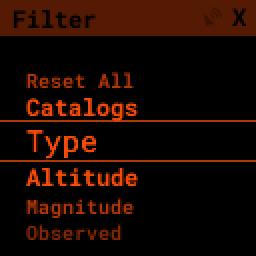
Some menus present a list of options where you can choose one or more items to control how the PiFinder operates. For instance the Filter menu items takes you to a sub-menu of different ways you can filter your object lists:
Selecting Type presents you with various DSO types that you can select to control what objects appear in your object lists.
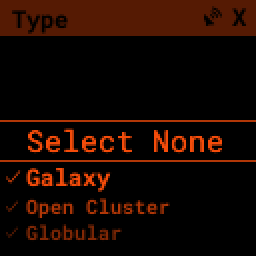
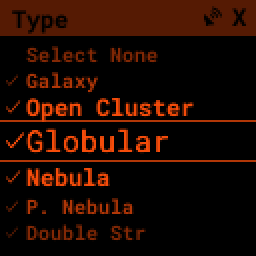
Lists that offer selections will usually have a check-mark next to the one, or many, option selected. Pressing the RIGHT arrow with an option highlighted will select or de-select that item.
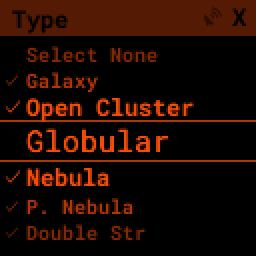
For some menus that only allow a single item to be selected, such as Altitude, selecting one item will de-select any others. Multi-Select menus have options to select or de-select all items for ease of use.
When you are done selecting options for a particular setting, you can use the LEFT arrow key to return to your last menu or screen.
With this simple set of scroll and select tools you can access all the powerful features of the PiFinder.
Quick Menu
Although you can access everything the PiFinder has to offer using just the menu system, we’ve introduced a secondary quick-menu to bring some of those functions into easier reach.
Hold down the SQUARE key to access the Quick Menu
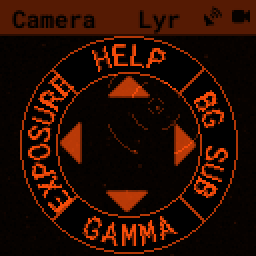
This menu presents up to four options, one for each arrow button. Pressing that arrow will select that item. This menu is different depending on what screen you are on, but often has HELP at the UP option.
Some Quick Menus have multiple layers like the one above. Selecting RIGHT will open the Background Subtraction (BG SUB) options. To indicate a current setting, one option may have some subtle shading. The image below is showing that the BG SUB setting is currently HALF.
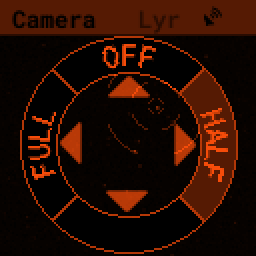
Selecting LEFT would switch this option to FULL. You can exit the Quick Menu at any time by pressing the SQUARE button again.
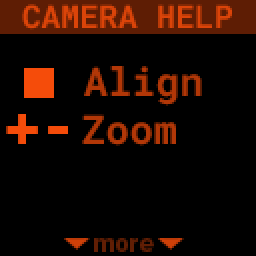
Help System
Many screens offer help with specific button functions and other details about how things work or the purpose of a particular page.
When available, HELP will be the UP option in the Quick Menu
Pressing the UP arrow will select the help option and display one or more pages of help. There will be a prompt at the top or bottom of the screen to show if more pages are available and pressing UP or DOWN will scroll through them
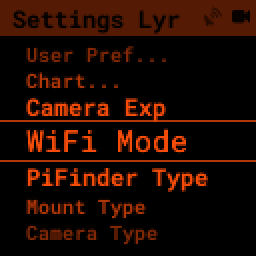
Settings Menu
All of the user configuable items for the PiFinder can be found in the Settings Menu which is near the bottom of the main PiFinder menu
The top items collect several options together under User Preferences and Chart Screen. The elipsis (…) indicates that there are more options below.
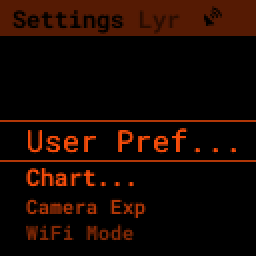
Below the general UI options are settings to change which WiFi mode your PiFinder is in, what its physical configuration is and more physical configuration items.
Observing with PiFinder
When using the PiFinder under the stars to explore the universe, you’ll be doing four basic things in various combinations:
Curating a list of objects you are interested in
Viewing details about those objects
Pushing the scope to bring them into your eyepiece
Logging your observations
Everyone has their own unique way to observe, so the PiFinder offers differnet ways to use (or not use!) these features to facilitate a great night of observing.
Object List
The Object list is one of the main features of the PiFinder. It presents a collection of objects you’ve selected using catalogs, filters, observing lists and text search tools.
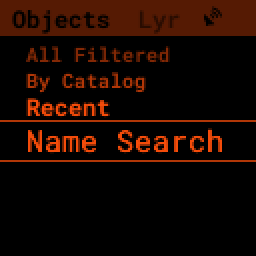
To select a starting point for your observing journey, choose Objects from the main PiFinder menu. You can then choose from one of four options:
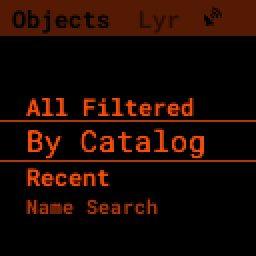
All Filtered: This will show you all the objects across all catalogs that meet your filter criteria. This could be thousands of objects and is most useful with very strict filter settings, such as only looking for globulars above 30 degree altitude and brighter than magnitude 10.
By Catalog: Shows all objects from a specific catalog that meet your filter criteria. Great for observing projects and looking for the nearest objects in a particular catalog.
Recent: This list starts empty and will contain a history of all the objects you’ve checked out during your current observing session
Name Search: Using the number keypad and T9 style text entry, you can search for objects by name. The snowball planetery? Cats-Eye? This is the way to find them!
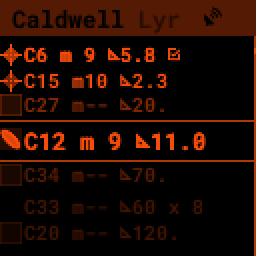
No matter how you get objects onto the list, it always displays the same information and allows you to sort and select the same way.
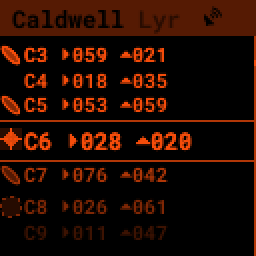
Along the left side is a symbol showing what sort of object each line represents. Next to that is the designation of the object, usually the catalog abbreviation and index number, then the distance from your current telescope position to this object. The brightness of each entry in the list gives a little hint about it’s magnitude.
Pressing the SQUARE key will cycle through additional information for the objects on the list.

You can see a scrolling list of common names for each object.
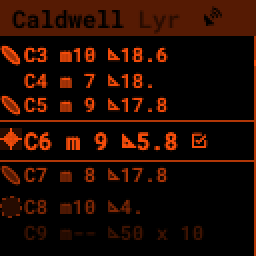
And the magnitude and size of each object along with a little check mark to indicate if you’ve observed this object before.
Holding down the SQUARE key will bring up the Quick Menu which allows you to sort and filter this list
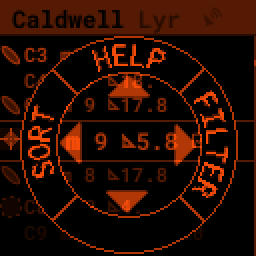
Pressing LEFT will select SORT
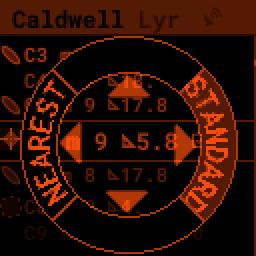
By default, lists are sorted in STANDARD order… usually the order they appear in catalogs. You can choose another sort order such as NEAREST by pressing the arrow key indicated. Sorting by NEAREST puts the object which is closest to your current telescope position at the top of the list.
If you start typing a number, the Object list will jump to the next object with that index number. You can use the UP/DOWN down arrows to go to the next/previous match and use the SQUARE key to exit the jump mode and select an object.
Pressing the RIGHT key will bring you to details for the selected object….
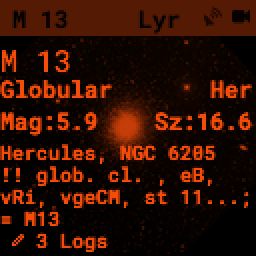
Object Details
Pressing the RIGHT key from the Object list will bring you to the Object Details screen for the highlighted object. This screen shows large Push-To instructions, object images and catalog details for objects.
Pressing SQUARE will cycle through the differnt information for the object and UP/DOWN will move to the next or previous object in the list. LEFT will bring you back to the full list and RIGHT brings up the Logging interface for the current object.
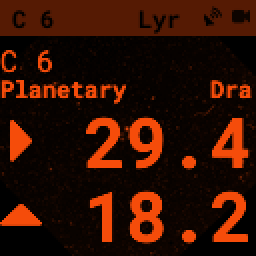
The Push-To info shows which way, and how far, to move your telescope to put the selected object in your eyepiece. As you move the scope the numbers will dim a bit to indicate that the PiFinder is using the accelerometer to provide and estimate of where the telescope is currently pointing. When you stop, or move slowly enough, the camera will be able to plate solve and provide an absolute position which will cause the numbers to brighten again.
When the numbers are near 0.00 the object should be in your eyepiece. The numbers indicate the distance to the object in degrees. So if you have an eyepiece with a 0.5 degree true field of view, getting the numbers below 0.25 (half the true field of view) should be enough to put the object within the eyepiece.
Closer to zero will mean more centered. If you are trying to find a very dim object, knowing it’s right in the center of field and consulting the object image can really make a difference.

The PiFinder can display images of all the objects in it’s catalog! See the section on object images below for more information
Depending on the catalog, the PiFinder may have detailed notes about objects along with Type, constellation, magnitude and size. Use the +/- keys to scroll the notes field. At the bottom of the notes is a counter of how many times you’ve logged this object.
Filters
All the object lists aside from Name Search and Recent will only show objects that meet the filter criteria you have set. You can always view and adjust your filter settings using the Filter menu available from the main PiFinder menu
You can also jump to the filter options using the Quick Menu available from the Object List screen
The Filter menu has several ways to limit which objects appear in the object list along with a Reset All option to completely remove all filters.
With no filters set every object available will appear on the object list. For instance the All Filtered list will show over 18,000 objects!
Some filter types can have a single value, like Altitude, and some allow you to select multiple options, like Object type. Here’s a brief explanation of each:
Catalogs: This allows you to limit which catalogs are included in the All Filtered list. This is distinct from the Catalog specific object lists, which are a sort of shortcut to view objects only from one specific catalog. Using the Catalogs filter you can use the All Filtered list to see all of the different globular clusters across multiple catalogs.
Type: Limits by object type. You can select multiple types of objects to include in your lists.
Altitude: The current apparent altitude of this object from your observing location.
Maganitude: Limit objects displayed to those at least as bright as the selected magnitude.
Observed: Only include objects you’ve logged already, never logged, or any logged state.
Catalogs Filter
The PiFinder has many different catalogs so this menu groups them by categories.
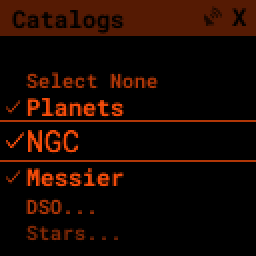
Some common catalogs are listed on the top level for quick reference and less common catalogs are listed in their sub-categories indicated with an elipsis (…)
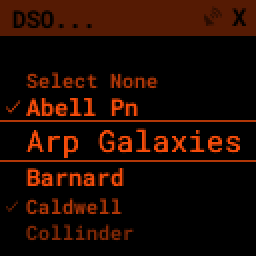
Here’s the DSO… category as an example:
Selected catalogs are indicated with a check box and you may see the same catalog, like Messier, listed in multiple spots. Selecting or de-selecting anywhere will change the state everywhere.
Name Search
A powerful way to search the large database of objects included with the PiFinder is by name. This lets you find objects by their common description, like the Cats Eye nebula. To access the Name Search screen select it from the Objects menu:
It uses a T9 style text input, like some popular celluar phones at the dawn of text messages! The on-screen keypad shows the letters that are available by pressing each number key multiple times in a row.
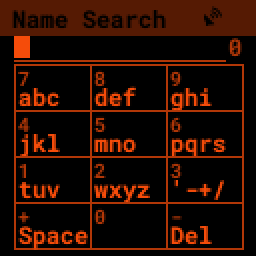
Each number key will generate it’s number, then the three letters displayed in turn. If you pause long enough between key-presses, or press a differnt key, the cursor will move to the next position.
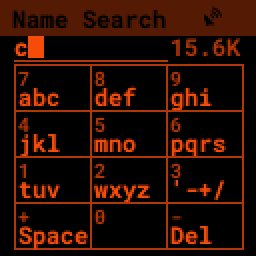
As you enter text, the PiFinder will show you how many objects match your search term to the far right of the text you are entering.
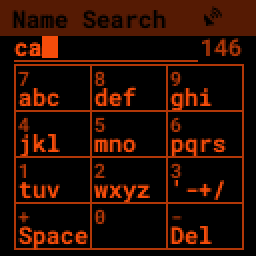
You can see the number of objects reducing as we add more text….
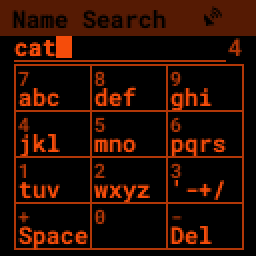
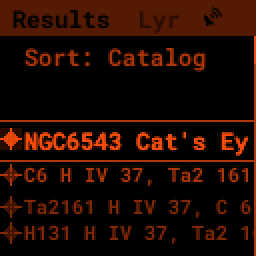
Once you have enough of a search term to limit the list of objects, press the SQUARE key to see the full list of matching objects.
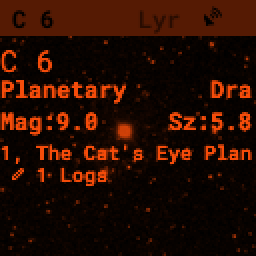
Object Images
If you have used the prebuilt PiFinder image or have downloaded the set of catalog images you can view what the selected object looks like via images from sky surveys. These images will display in the background of the Object Details screen and you can see them in full detail by pressing the SQUARE key to cycle through various pages of information about each object.
The images will be rotated and orient as they will appear through the eyepiece at the position and time you are observing them to help you identify the faintest of targets.
You can zoom in an out via the +/- keys and the FOV will be displayed at the bottom of the image so you can match it with your eyepiece FOV.
As an example, here are the images available for M57


These images are oriented as they would be through the eyepiece in a newtonian reflector pointing at a specific area of the sky from your current location. You can use the + and - keys to switch between several eyepiece field of view: 1, 0.5, 0.25, 0.12 degrees
The bottom left of the screen shows the source of the current image and the left side shows the current FOV information.
Logging Observations
Pressing the RIGHT arrow when looking at the details of any object will bring you to the logging interface. Here you can add a bit of context about your observation and save it to your log.
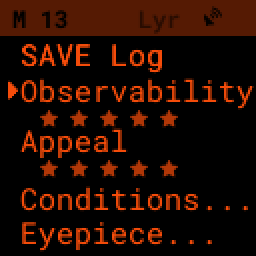
Use the UP/DOWN arrows to select one of the four context items to change:
Observability: How easy is it to spot and recognize this object
Appeal: Overall rating of this object.. would you refer a friend?
Both of these first two items are set by choosing a number between 1 and 5 to set the rating or pressing the RIGHT arrow to cycle through the stars.
Conditions…
Transparency: A relative measure of contast.
Seeing: The stillness of the atmosphere.
Eyepiece: You can note which of your eyepieces you are using.
When you are done adding context, or if you want to just note that you observed an object without context, use the UP/DOWN arrows to select SAVE LOG to record your observation.
Observing Projects
If you are like me, you may enjoy various observing projects, such as observing all the Messier or Herschel objects. The PiFinder makes these longer term efforts easy by allowing you to log each object and then only showing you objects you have left that are visible during any observing session!
Combining the ability to filter a catalog by observation status and sorting the object list by the nearest objects allows you to work your way through a collection of objects easily.
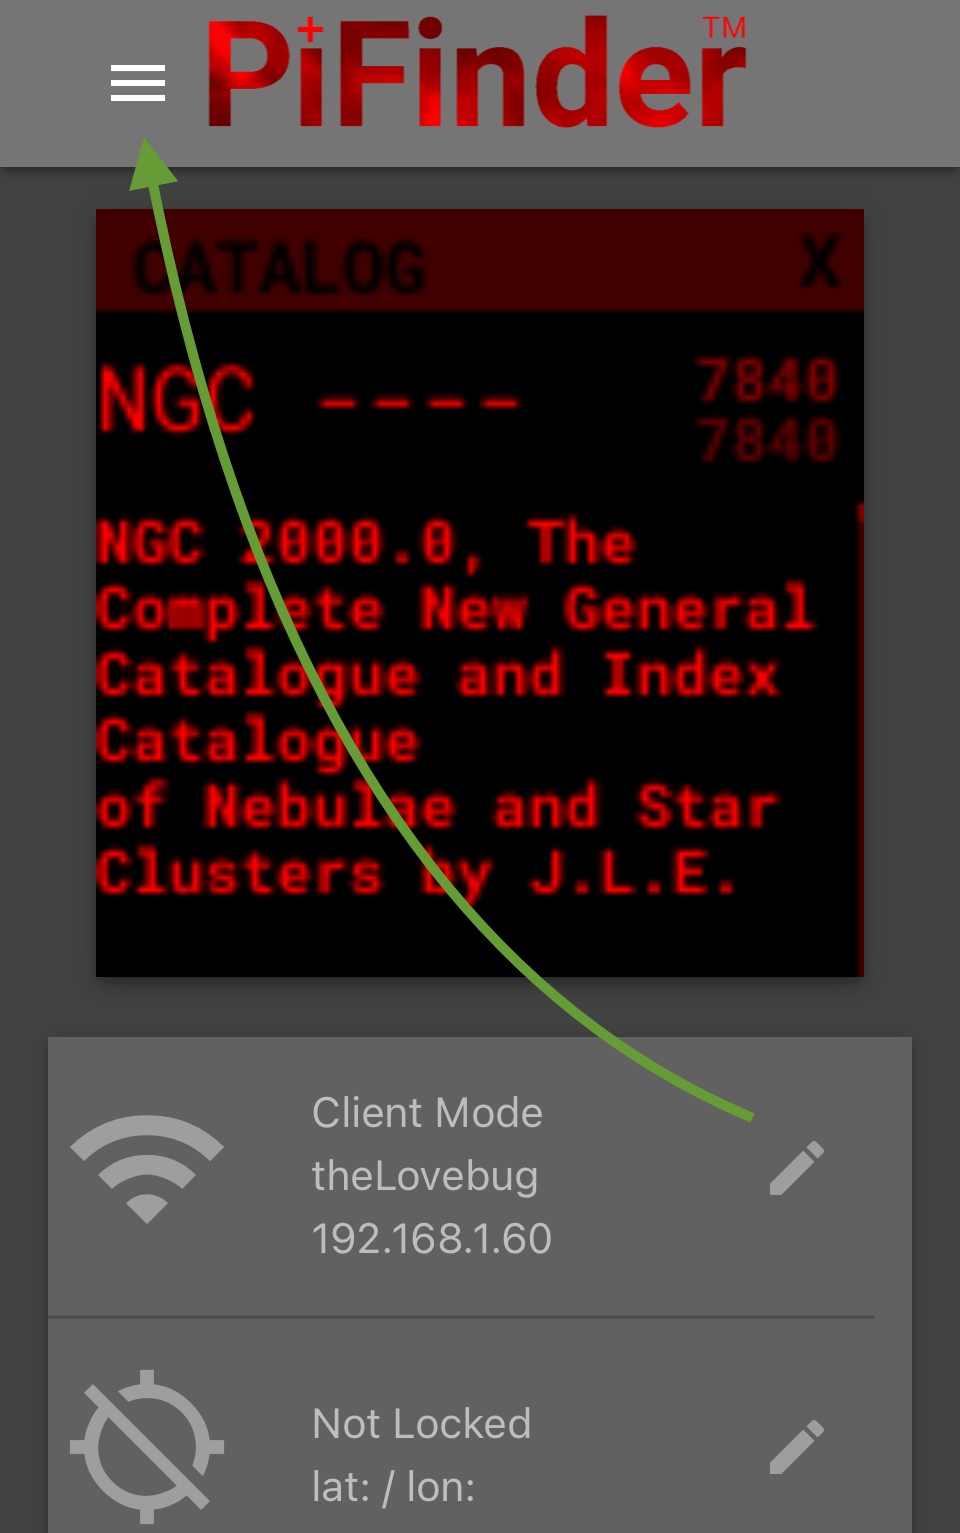
Tools
Near the bottom of the main PiFinder menu is an option that brings you to a set of tools. These are screens that are not observing related but provide useful information about the PiFidner or let you perform actions.
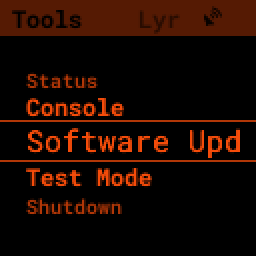
Status: General info about about the PiFinder operation.
Console: Shows messages from various PiFinder subsystems
Software Upd: Updates the software of your PiFinder.
Test Mode: Puts the PiFinder into a demo/debug mode which loads and solves an image from disk. Will prevent proper operation at night, but allows exploration of PiFinder features during the day.
Shutdown: Shuts down the PiFinder
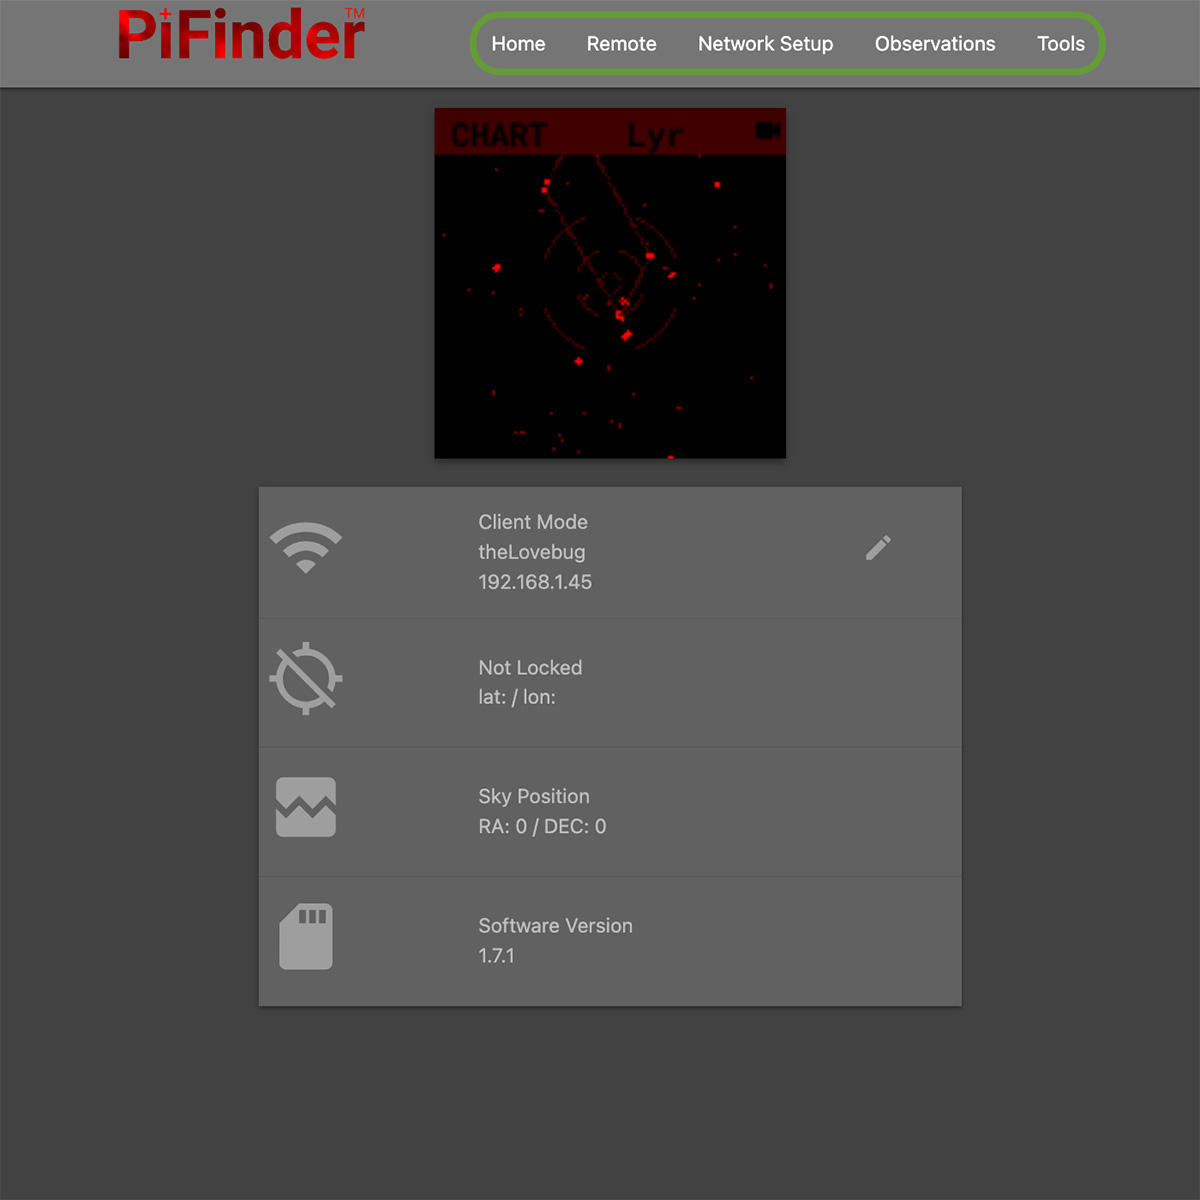
Status Screen
The Status Screen is the central place to get information about the current state and operation of the PiFinder.
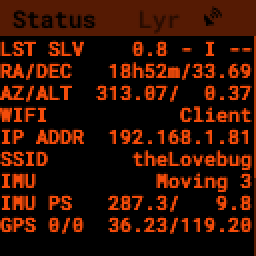
Some of the key bits of information displayed:
The current solver state displayed as LST SLV on the top line. It shows the number of second since the last plate solve, the current solve state (i for IMU or C for camera) and the number of stars matched if the current solve is a camera solve
WiFi information is displayed a bit further down including the current WiFi mode, network name and IP address.
Shutdown
Although shutting down is not strictly needed before power-off, the PiFinder is a computer and there is a chance of file corruption if you do not. Some MicroSD cards are more sensitive to this than others.
The Tools menu offers a Shutdown option, and there is a quick way to access this as well.
To easily shut down the PiFinder:
Hold the LEFT arrow button for more than a second to jump to the main menu
Hold the SQUARE button to access the Radial menu
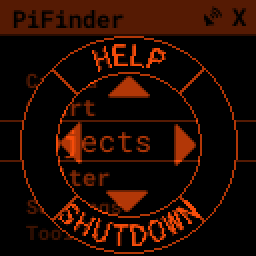
Press DOWN to select the SHUTDOWN option
Use the RIGHT arrow to confirm, or the LEFT arrow to go back
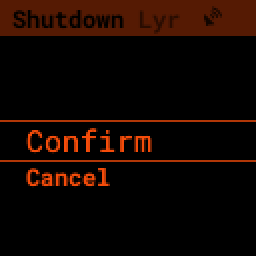
When you confrim the screen and keypad will turn off after a few seconds and it’s then safe to turn off the unit using the power switch or unplugging the battery.
WiFi
Access Point and Client Mode
The PiFinder can either connect to an existing network via the Client mode, or serve as an wireless access point for other devices to connect to via the Access Point (AP) mode. Use the Web Interface or the Status Screen to switch between these two modes and to see which mode is currently active.
Using the PiFinder in Access Point mode creates a network called PiFinderAP with no password to allow easy connection of phones, tablets and other devices in the field.
To use the Client mode, you’ll need to add information about the WiFi network you’d like the PiFinder to connect to using the Web Interface as described in Connecting to a new WiFi network
PiFinder address
In most cases, you can use the name pifinder.local to connect to the PiFinder. On older computers
or those that don’t support zeroconf networking, you can use the IP address provides on the Global
Options screen to connect. You can connect to the PiFinder via:
A web browser to use the Web Interface for remote control, setting up access to other WiFi networks and for configuration changes
SSH to get shell access for advanced users
SMB (Samba) to access saved images, logs an observing lists
LX200 protocol to allow updating of a planetarium app, such as SkySafari , with the position of the telescope
Web Interface
The PiFinder provides an easy to use web interface which allows you to:
See the current PiFinder status
Remote control the PiFinder via a virtural screen and keypad
Change network settings and connect to new WiFi networks
Backup and restore your observing logs, settings and other data
View and download your logged observations
To access the web interface for the first time, make sure the PiFinder is in Access Point mode (see Settings Menu). This is the default for new PiFinders to make first time set up easier. Using a phone, tablet or computer, connect to the PiFinder’s wireless network called PiFinderAP. It’s an open network with no password required. Once connected, open your web browser and visit:
http://pifinder.local
|

|
The home screen shows the general PiFinder status info and a live view of the screen. Depending on your screen size you’ll either see a navigation bar along the top of the page, or a ‘hamburger’ menu in the upper-left which contains these same options for smaller screens.
While the home screen not require a password, most other functions will. The password for the web
interface is the same as what is used for the pifinder user and changing one will change
the other. The default password for new images and PiFinders is solveit. This can be changed using
the Tools option in the web interface.
Connecting to a new WiFi network
The default behavior of the PiFinder is to generate it’s own WiFi network call PiFinderAP that you can connect to
and configure additional networks. To get the PiFinder to connect to an existing WiFi network with Internet access you
can follow the steps below:
Make sure the PiFinder is in Access Point mode
Connect your phone, tablet, or computer to the PiFinder’s wifi network called PiFinderAP
Visit http://pifinder.local using your web browser
- Click the ‘Network’ link in the top bar, or if you have a smaller screen, click the three stacked horizontal lines in the upper-right corner to access the menu and choose ‘Network’ from there.
When prompted enter the password for your PiFinder. The default is solveit.
- Scroll down until you see the ‘Wifi Networks’ section and click the + button to add a new network
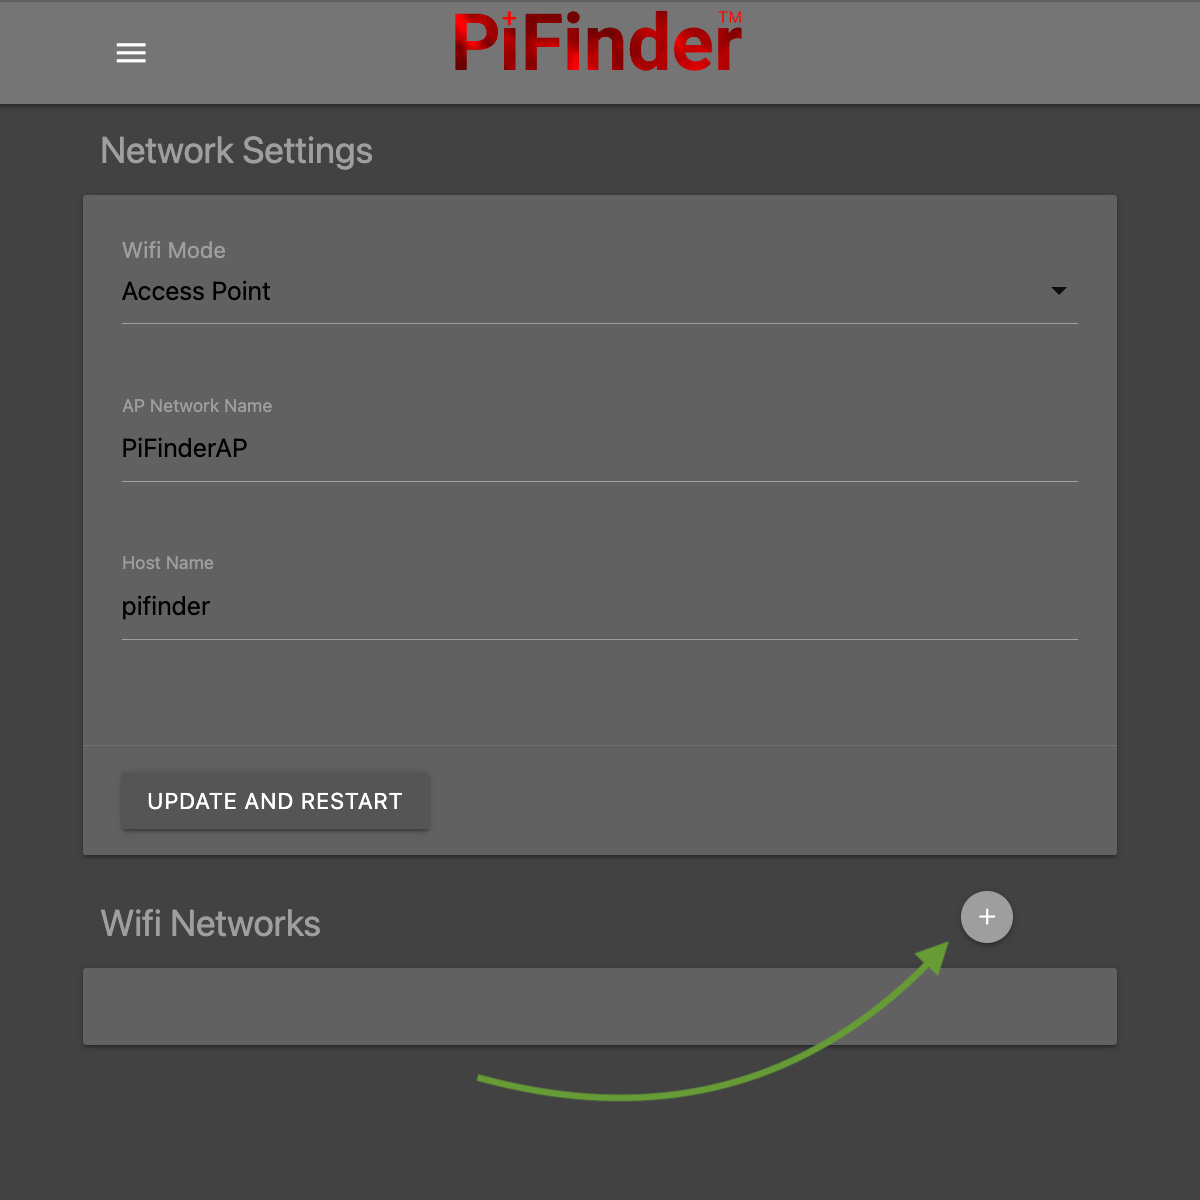
Enter the name (SSID) of your network and the password in the form. If your network does not have a password, leave the Password field blank.
Click the ‘SAVE’ button to save the new network
You should now see the network you added in the ‘Wifi Networks’ section of the page
Scroll up and change the Wifi mode from ‘Access Point’ to ‘Client’ so that the PiFinder will attempt to connect to your network next time it restarts
Click the ‘UPDATE AND RESTART’ button
To add more WiFi networks for the PiFinder to look for, navigate to the Network Setup page of the Web Interface and click the + button near the list of WiFi networks and repeat the steps above.
SkySafari
The PiFinder can provide real-time pointing information to a device running SkySafari via the LX200 protocol. See this SkySafari document for complete details, but here is the connection info:
Use ‘Other’ telescope type
Mount Type: Alt-Az, GoTo.. even if your scope is Push-To. This allows sending of targets from SkySafari to the PiFinder
Scope Type: Meade LX200 classic
IP Address:
pifinder.localor IP address provides on the Status screenPort: 4030
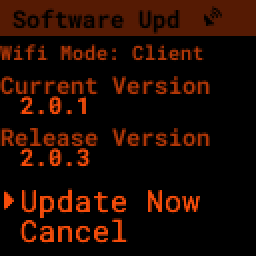
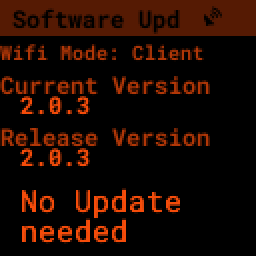
Update Software
The PiFinder offers a way to download and install software updates directly from the PiFinder screen and keypad. To start this process you can choose Software Upd from the Tools

The PiFinder will need to be connected to the internet, so you’ll need to have it in Client Mode and connected to a WiFi network. See Connecting to a new WiFi network for more details.
The PiFinder will check to make sure it can access the internet then compare the current release version to the version installed.
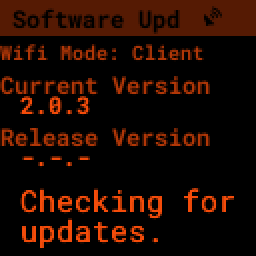
If a new version is available, you can use the presented option to start the update. This may take several minutes and the PiFinder will restart when it’s done.
You can also download a pre-built image of any software release and write it to the PiFinder’s SD card. See our release page to find information about any of our releases and a link to download the images.
Instructions for writing software release images to an SD card can be found on the software setup page.
FAQ
Have any questions? Please send them through to me at info@PiFinder.io and I’ll do my best to help and potentially add your question here. Better yet, feel free to fork this repo and contribute via a pull request!