Quick Start
Note
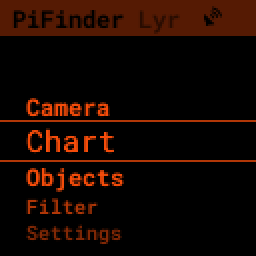
This documentation is for v3 and v2.5 PiFinders running software 2.2.0 or above. You can see what version of software is running by looking in the upper right of the welcome screen.
If you need docs for a previous version please choose 1.x.x , 2.0.x or 2.1.x
Congratulations on getting your hands on a PiFinder™! Whether you built it yourself or ordered a finished unit from BBLabs, you’re on your way to a new level of accuracy and ease at the eyepiece.
This Quick Start gets you out and observing with most of what you need. For the rest — settings and non-observing functions — see the full User Guide.
We’ll get your PiFinder running for the first time, walk you through your first night out, show you how to change your settings, and leave you confident in how it works.
PiFinder takes continuous pictures of the stars, compares them to its database, and tells you exactly where your scope is pointed. This process — called plate solving — runs constantly, so the PiFinder always knows your aim. An accelerometer (like the one in a mobile phone) senses when you move the scope, so between solves the PiFinder can still tell you where to go.

Unboxing
The PiFinder arrives fully assembled and ready to use. The keypad and screen are how you’ll interact with it — choosing what to look for, getting Push-To guidance, and logging objects.


Depending on your configuration, the camera may face a different direction or sit in a different spot, so it can see the sky while the keypad and screen stay within easy reach on any type of scope.
Powering the PiFinder
If your PiFinder has the optional internal battery, charge it before first use. Plug a USB-C cable into the port on top, closest to the back of the case, arrowed below. The charging indicator glows blue while charging and turns green when complete.
The power switch is the small white switch on top, above the screen, boxed below. Facing the screen, slide it right for on, left for off.
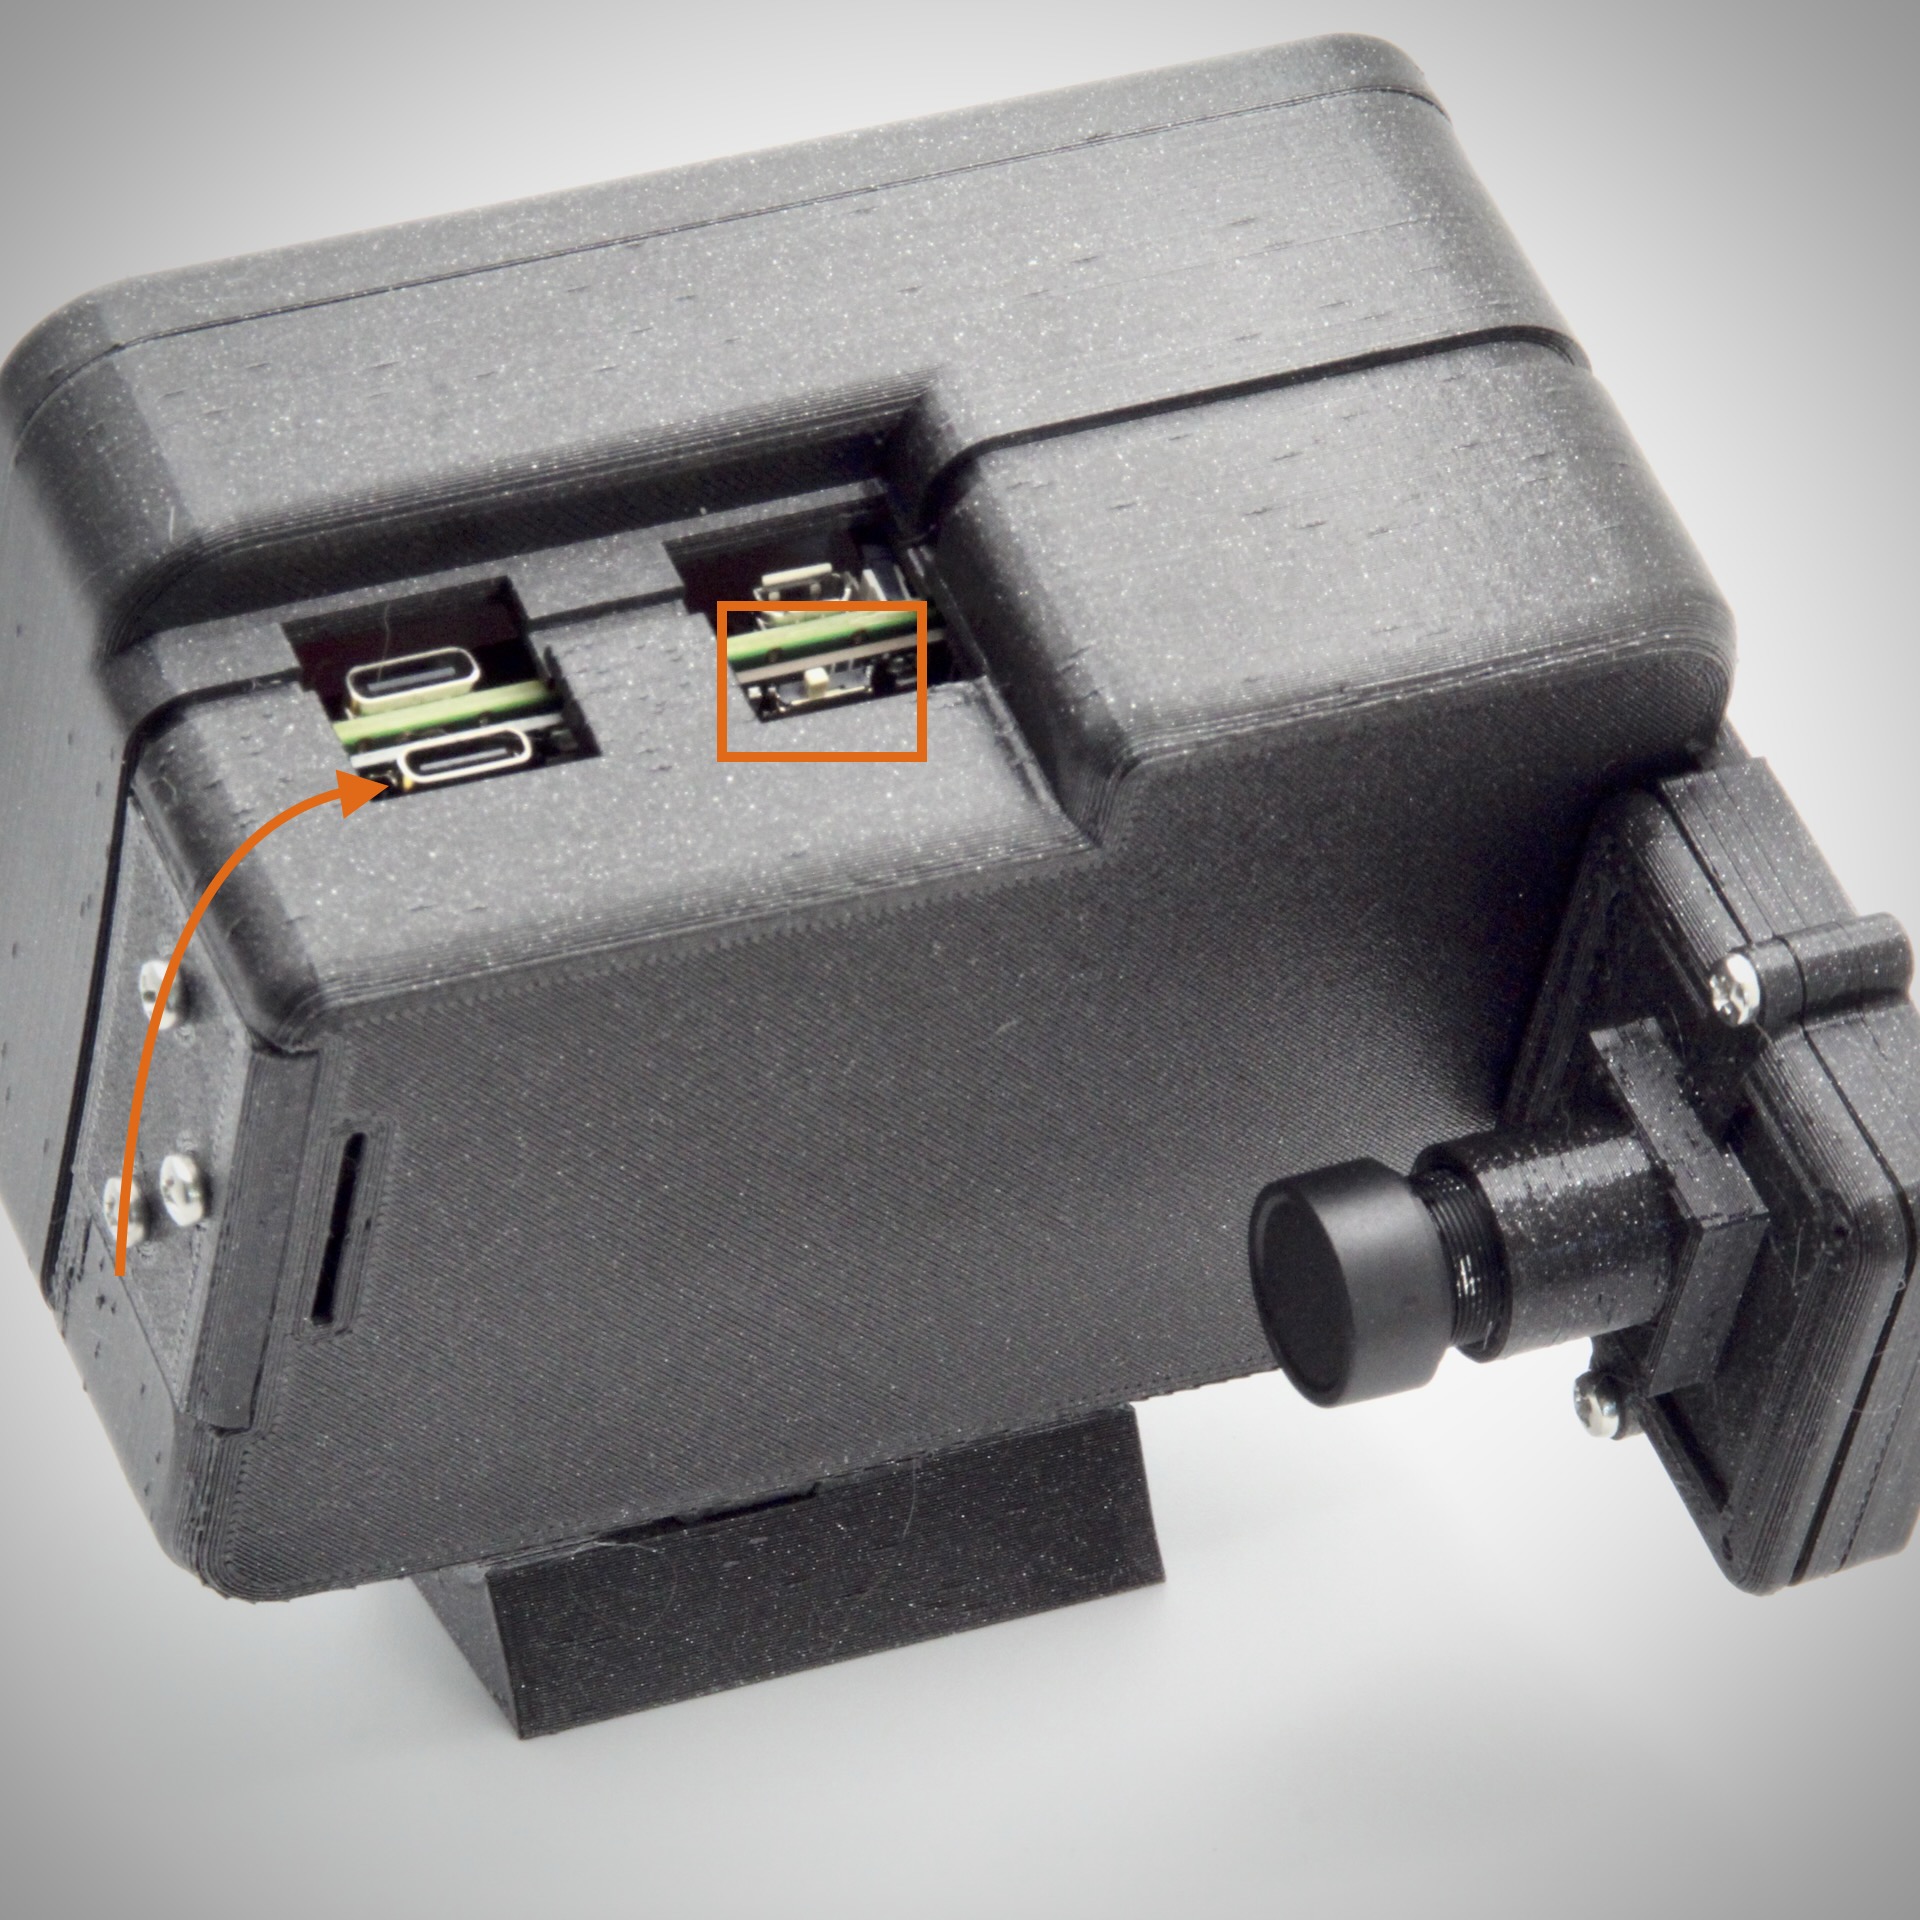
For external power, either USB-C port will run the unit. The port on the Raspberry Pi nearest the keypad (the only one if you don’t have the internal battery) powers the PiFinder but won’t charge the battery. To both power the unit and charge the battery from external power, use the charging connector with the white switch set to On.
The first power-on takes a minute, and the welcome screen may come and go as the PiFinder restarts; later start-ups are much quicker. Once it’s powered on, you’ll see a welcome image, then some loading information, and finally the Main Menu.
Using the PiFinder
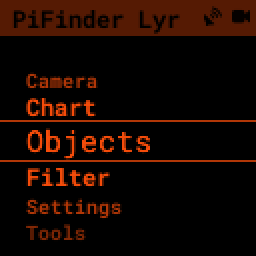
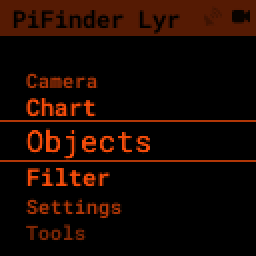
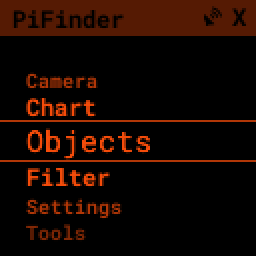
The PiFinder uses a scrolling menu with the active option highlighted in the middle of the screen.

Every feature is reached through this menu — by scrolling, selecting options, or moving between screens:
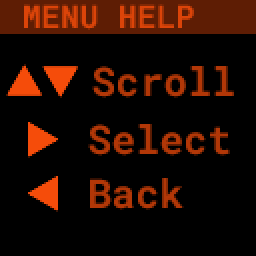
The UP and DOWN arrows scroll the current menu
The RIGHT arrow activates the current option, selecting it or moving to another menu
The LEFT arrow takes you back to the previous menu or screen
Holding LEFT for more than a second always jumps back to the TOP of the menus
Some menus, like the catalog selection, let you check multiple options on and off with the RIGHT arrow.
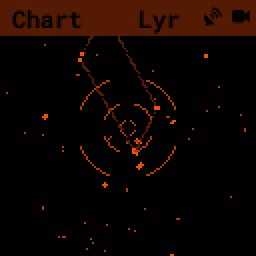
Other menu items take you to specific functions, like a star chart showing where your telescope is currently pointing.
The LEFT arrow always takes you back to the previous menu or screen.
Many screens use the number keys along with +, -, and SQUARE for extra functions, listed in that screen’s help pages.
To open a screen’s help (and other screen-specific options), hold SQUARE for more than a second to bring up the handy Quick Menu (the radial menu).

The Quick Menu offers four options you can reach quickly with the arrow keys; UP normally selects HELP.
Use the UP and DOWN arrows to read through all of a screen’s help.
The PiFinder has a lot of powerful features, but they all live in this menu system and use the same basic set of buttons to get around.
Configuration Setup
The PiFinder comes in several configurations (Right/Left/Straight/Flat). Set yours in the software so the PiFinder can give pointing directions that match your setup.
From the main menu, select Settings, scroll down to Advanced, then select PiFinder Type.


Highlight the type of PiFinder you’re using and press RIGHT to select it. This restarts the PiFinder software.

Mounting
The PiFinder comes set up with a 32 mm dovetail that fits the standard finder shoe found on most scopes. Below is the finder shoe with a version 1 PiFinder mounted in it; current PiFinders attach the same way.


The PiFinder works out its own orientation, so it no longer needs to sit perfectly upright — any mounting angle is fine, as long as the camera points where the scope points. You may still prefer it roughly level so the screen is easy to read.
The dovetail is adjustable, so you can set a comfortable angle even if your finder shoe isn’t right at the top of the optical tube. Loosen the two dovetail screws, set the PiFinder on your scope, adjust the angle to suit, then remove it and tighten the two screws. You’re all set for a night of observing.
Note
Mount the PiFinder so the camera has an unimpeded view of the sky.
Left, right, straight and flat versions each need the software configured to match — see the ‘Configuration Setup’ section above.
First Time Out
Once your PiFinder is charged and your mount is set on your scope, you’re ready to head out to your observing site. Set up your scope, mount your PiFinder, and read on.
You can start using the PiFinder as soon as several stars are visible in the part of the sky it faces — it uses those stars (and its internal GPS sensor) to learn where it is and what it’s looking at, so it needs a few stars to get going. That might be soon after sunset, or, under light pollution, not until full darkness.
Two icons in the upper right tell you whether the PiFinder knows where it is. The satellite dish is solid once a GPS signal is received and a location acquired, and flashes while searching for location and time.
The other icon shows how the PiFinder determined your telescope’s position. A camera means it has plate-solved its current view; the camera fades when the scope is moving and it’s relying on the accelerometer. An ‘X’ means it hasn’t worked out where it’s pointing yet (see Setting Focus & First Solve).
GPS Location + Camera Solve Ready to go! |
No GPS - Will be flashing Wait a bit…. |
No plate solve yet Check focus if it’s dark |
Note
The GPS receiver must be outside to get a lock, and it can take several minutes to gather everything it needs to calculate its location and date/time. Expect a longer wait after the PiFinder has been off for a long period, or moved a distance while off; later start-ups at the same location are quicker.
Leaving the PiFinder on the GPS Status screen speeds up the lock: this screen disables the camera, which reduces EM noise and helps the receiver see more satellites.
Note
No GPS, or don’t want to wait for a lock? You can enter your location and time by hand and start using the PiFinder right away — see Place & Time in the User Guide.
Adjusting Brightness
You can adjust the brightness of the screen and keypad at any time: hold SQUARE and press + for brighter, or - for dimmer. At a dark sky site, turn it right down to preserve your dark-adapted vision.
Note
After it’s been idle for a while, the PiFinder dims the screen and slows its exposures, solving, and other processes to save battery and prevent glare at the eyepiece. The default is 30 seconds; you can change it, or turn it off, in the Settings Menu. Any button press, or moving the PiFinder, wakes it.
Start with the Start menu
At the start of each session, you may need to do a few things:
Check and adjust camera focus
Align the PiFinder by telling it where your scope is pointing
Check the status of the GPS lock
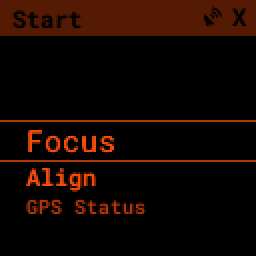
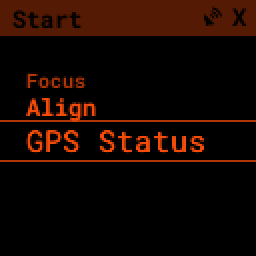
These items live in the ‘Start’ menu at the top of the PiFinder main menu.
You won’t always need all three. Focus generally holds from night to night, and if you leave your PiFinder on your scope you may not need to re-align. Most functions need a GPS signal, which happens automatically — but the GPS Status screen lets you monitor progress toward a lock and boost the signal, which helps in marginal conditions or to speed things along.
Setting Focus & First Solve
Once stars are populating the sky, turn on your PiFinder, take off the lens cap, and aim at one of the brightest stars you can see; it gets to work solving straight away. The lens focus is set when your PiFinder is assembled, but may need a little adjustment to catch the dimmest stars.
Note
Focus is the single most common reason a PiFinder won’t solve. Stars that look sharp by eye are often still too soft to solve, so rather than judging focus by sight, use the HFD readout and its graph on the Focus screen (described below) to find the sharpest point precisely.
Screw the lens in and out in the holder to adjust focus. Starting from scratch — a new build, or a lens that’s been moved — set the lens so about 6 mm of thread is showing (roughly the width of a pencil). That’s close to in focus and a good place to begin.
Select the ‘Focus’ option under the ‘Start’ menu.
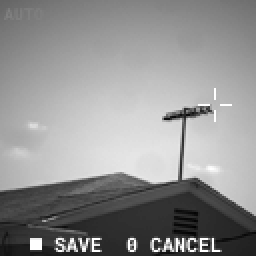
The Focus screen shows a live preview of what the camera is seeing, with special image processing that highlights stars and removes background skyglow to make focusing easier.
With no stars visible or the image well out of focus, the screen may look too bright, too dark, or noisy — normal until the camera is near focus. Some examples:
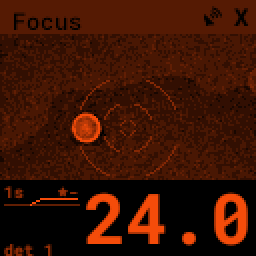
Unfocused: bright, noisy background and a high HFD |
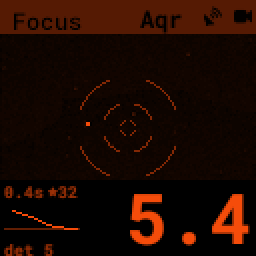
At best focus: dark background, a tight star and a low HFD |
Pan your scope until a bright object appears in the camera view. Screw the lens in and out to focus; once something star-like is in the FOV and near focus, the preview’s image processing will work properly and start dimming the background and highlighting the stars.
Along the bottom of the Focus screen is the focus strip, which turns focusing from a judgement call into a number you can chase. A large HFD readout — the Half-Flux Diameter of the stars it finds, in pixels — fills the right of the strip. This is simply how spread-out the stars are, so a smaller number means tighter, sharper stars: as you adjust the lens, your goal is to make the HFD as small as you can.
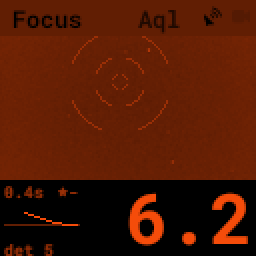
To the left of the readout a graph plots the HFD over the last several seconds. As you slowly turn the focuser the line traces a “V” — dropping as the stars sharpen, reaching a low point at best focus, then climbing again as you go past it. Stop at the bottom of the V. The graph is scaled to the range a real lens reaches — about 4 px at sharp focus up to 20 px when clearly soft — and a marker line shows the best (lowest) HFD seen recently. Small labels show the current exposure time, det (the number of stars the focus screen detected) and, once a solve succeeds, the matched-star count next to the star icon — watch that jump from zero the moment your stars are sharp enough for the PiFinder to recognise them.
If the image is too far out of focus to measure, the readout shows keep going until a star comes
into range. The strip works at every zoom level, since the HFD doesn’t depend on zoom, and you can
press the SQUARE button to hide or show it if you’d rather see the bare image.
Work in small steps. The whole journey from stars too soft to see on screen to good focus is only a few turns of the lens, and the difference between fair and good focus is less than half a turn. Turn the lens an eighth to a quarter of a turn at a time, then take your hand away for a moment so any vibration settles and the readout catches up. Bigger or continuous turns make it easy to sweep straight through best focus without ever seeing it.
Good focus means the quickest solves. Close will work, but it’s worth driving the HFD down to its lowest point — use the +/- keys to zoom the view to 2x and 4x and get the stars as tight as you reasonably can. With dark enough skies and good focus, the camera icon appears in the top right and the current constellation shows in the title bar. Congratulations — the PiFinder knows where it’s pointing!
If you touch up focus on a later night, judge it here on the Focus screen rather than by the camera icon — a solve takes a second or so to catch up with each change of the lens, so the icon always lags a little behind. The HFD readout responds much faster, and the technique is the same: a small turn, then a pause to let things settle.
Note
Can’t get a plate solve? The usual culprits are simple: make sure the lens cap is off and the PiFinder isn’t moving, then check focus — soft stars stop solves, so watch the HFD on the Focus screen and adjust the lens until it reaches its lowest value. For anything beyond that — obstructions, dew, thin cloud, exposure settings — see the Troubleshooting & FAQ page.
Alignment
To get the most out of PiFinder, you need to align it with your telescope. PiFinder uses digital alignment: instead of physically nudging the PiFinder so its field of view matches your scope, you simply tell it where your scope is pointing within its wide field.
The camera sees a 10° patch of sky — about 20 full moons across — and your eyepiece’s much smaller field sits somewhere inside it. By pointing your telescope at a star and then selecting that same star on PiFinder’s chart, you tell PiFinder exactly where to place objects so they land in the center of your eyepiece.
Note
These instructions cover the alignment system in software version 2.1.0 and above. For the previous instructions, click here.
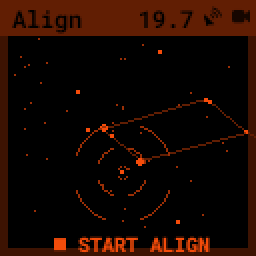
To begin, select ‘Align’ from the ‘Start’ menu.

You’ll see a rendered star chart with constellation lines showing the sky PiFinder is currently seeing. If you instead see a message about not having a solve, return to the focus section above.

The current alignment point is marked with a Telrad-style reticle. As you move your telescope the chart updates, and you can zoom in and out with the +/- keys.
Note
The reticle marks where your telescope is pointing within the camera’s wide 10° field, so it normally sits off to one side rather than in the center. That’s expected and does not mean your PiFinder is misaligned.
Now align in a few steps:
Pick a star you can easily recognize — a bright star, or one in a distinctive constellation or asterism. Any naked-eye star works, but you can’t align on a planet. Point your telescope at it and roughly center it in your eyepiece.
Look at the PiFinder screen and find that star plotted there. Use the +/- keys to zoom out if it helps you identify it.
Press SQUARE to switch to star-selection mode.
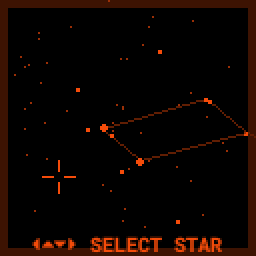
The large reticle is replaced by a small selection marker. The arrow keys jump it to the next closest star in that direction.
Use the arrow keys to highlight the star your telescope is pointing at, then return to the eyepiece and center it as well as you can.
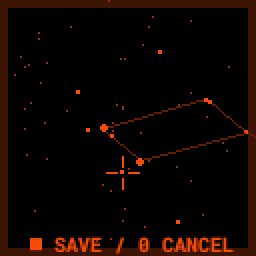
Press SQUARE to complete the alignment — PiFinder will now place objects wherever in your eyepiece that star sits. Or press 0 to exit without changing the alignment point.
The marker returns to the normal Telrad-style reticle, showing your newly adjusted alignment point. PiFinder saves it, so you won’t need to repeat this unless you remove and re-attach the PiFinder to your telescope.
Note
You can also align on any catalog object. If you’ve found an object and it’s not centered, center it up, hold SQUARE for one second, and choose align. This isn’t like adding alignment points to a standard DSC for accuracy — it simply tells PiFinder where in your eyepiece you’d like objects placed if your initial alignment wasn’t quite right.
Daytime alignment
The alignment above relies on a plate solve, so it only works once there are stars to see. To set things up during the day, choose ‘Align (Day)’ from the ‘Start’ menu. It reaches the same result by hand: you point your telescope at a distant object, find where the camera sees it, and mark that spot directly — no solve required.
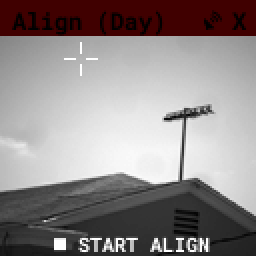
Opening the screen switches the camera to a short daytime exposure so you can see what it’s pointing at. Press SQUARE to begin.
The view splits into four quadrants labelled to match the keypad corners — 7 top-left, 9 top-right, 1 bottom-left, 3 bottom-right. Press the key for the quadrant your object sits in.
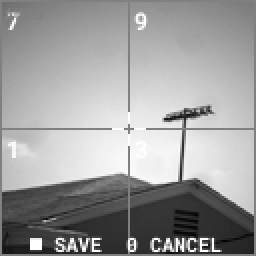
That quarter fills the screen and divides into quadrants again, so each press narrows the marker into a smaller area. Repeat for up to three rounds:
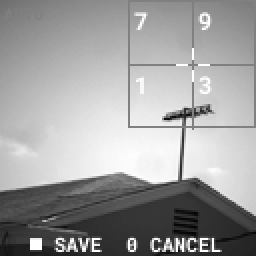
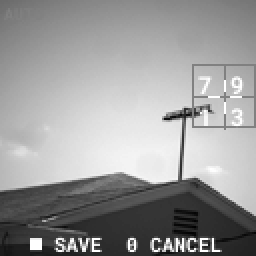
From there the arrow keys nudge the marker a pixel at a time for fine placement. The first arrow press also leaves quadrant mode, so you can switch to fine adjustment at any point.
Center your distant object in the eyepiece, move the marker onto it on screen, then press SQUARE to save. Press 0 to exit without changing the alignment. Pick something far enough away that the focus matches the night sky — a distant treetop, chimney, or hilltop, not something across the room.
Note
In daylight the image is shown in plain white rather than the usual red, since night vision isn’t a concern. If the view is washed out or too dark, + and - adjust the exposure by hand. Hold SQUARE for the Quick Menu, where ‘Exp Auto’ hands exposure back to the camera and ‘Center’ returns the marker to the middle.
GPS Status
A GPS status indicator in the PiFinder title bar flashes while the PiFinder searches for its position and time, and turns solid once it knows where and when it is. You can monitor this process and turn on a signal-boost mode from the ‘GPS Status’ item in the ‘Start’ menu.
The screen has two modes — a large-text summary and a full-details view — and you switch between them with the SQUARE button.
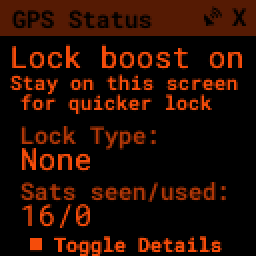
Easy to read summary |
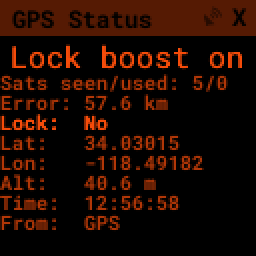
Full details view |
Under partially obstructed skies, or when a lock is just taking longer than you’d like, leave this screen active to boost the GPS signal by temporarily stopping the camera. Like most electronics, the camera generates electromagnetic noise that can drown out the faint GPS satellite signals.
Once a lock shows, press the LEFT arrow to return to the menu, re-activate the camera, and go find your first object.
Find Your First Object
Now that you’re aligned, it’s time to explore. We’ll select an object, get some information about it, and push your scope until it’s in the eyepiece.
Hold the LEFT arrow for more than a second to jump to the main menu if you’re not already there
Select Objects from the menu

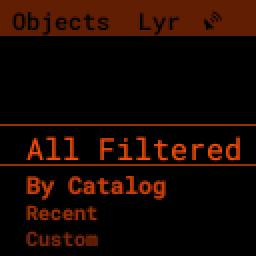
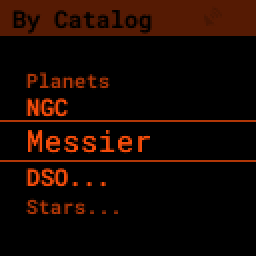
Scroll down to By Catalog to browse objects by catalog
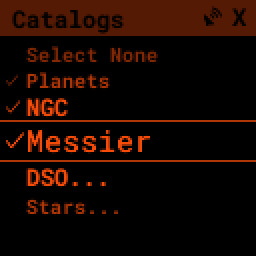
Select the Messier catalog from the menu

Selecting the Messier catalog brings up the heart of the PiFinder observing system, the Objects List. Here it shows every Messier object that matches your filters.
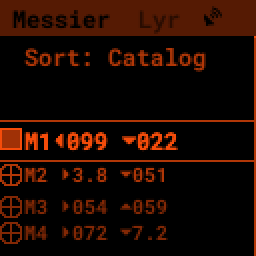

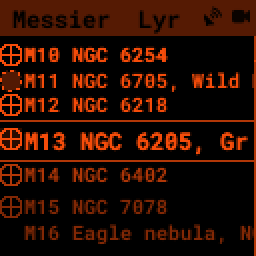
Press the SQUARE key to cycle the information shown for each object: Locate, Names, or Magnitude/Size
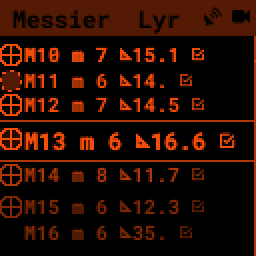
Use the UP and DOWN keys to browse objects and pick one you want to view
Press the RIGHT arrow to open Object Details, including Push-To guidance
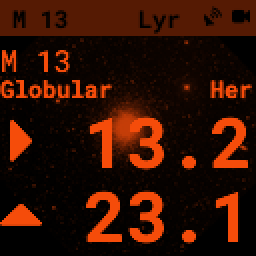
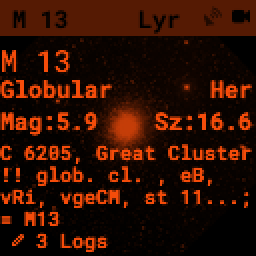
Object Details shows Push-To instructions by default; press the SQUARE key to see an image of the object or its catalog details instead.

Now point your scope at the object.
Press SQUARE to cycle the object information until you see the Push-To instructions
The Push-To instructions show how far to move your scope on each axis. The top arrow and number tell you which way to spin the scope — clockwise or counterclockwise — and how far in degrees. The lower arrow tells you whether to move toward the zenith or the horizon, and how far in degrees.
Watch the numbers as you move the scope; they change to show how much closer or further you are from the object. When both are near zero, the object should be in your eyepiece.
Note
How close to 0.00/0.00 you need to get depends on your eyepiece. With a true field of view of 1/2 degree, a readout below 0.25/0.25 puts the object somewhere in your eyepiece.
While you’re moving, the PiFinder estimates position from its accelerometer — less accurate than a plate solve, so the numbers dim slightly. Stop moving and it takes a fresh image, fixes your exact position, and the numbers shift a little and brighten to show a reliable solve.
Shutting down the PiFinder
Shutting down isn’t strictly required before power-off, but the PiFinder is a computer and skipping it risks file corruption. Hold LEFT for more than a second to jump to the main menu, hold SQUARE to open the Quick Menu, then press DOWN for SHUTDOWN and confirm with RIGHT. Once the screen and keypad turn off, it’s safe to cut power. The Shutdown section walks through it with pictures.
That’s the basics of using your PiFinder sorted. To learn more, continue to the full PiFinder™ User Manual.